안녕하세요. 오늘은 최근에 릴리즈 된 TVHeadend 4.2.1 버전으로 업데이트 하는 방법을 설명 드리겠습니다.


쉘로 접근하여 설치파일을 받습니다.


root@u5pvr-debian:~# wget http://download.djjproject.com/u5pvr/tvheadend_4.2.1_armhf.deb

converted 'http://download.djjproject.com/u5pvr/tvheadend_4.2.1_armhf.deb' (ANSI_X3.4-1968) -> 'http://download.djjproject.com/u5pvr/tvheadend_4.2.1_armhf.deb' (UTF-8)

--2017-04-27 20:13:19--  http://download.djjproject.com/u5pvr/tvheadend_4.2.1_armhf.deb

Resolving download.djjproject.com (download.djjproject.com)... 1.226.113.222

Connecting to download.djjproject.com (download.djjproject.com)|1.226.113.222|:80... connected.

HTTP request sent, awaiting response... 200 OK

Length: 5490574 (5.2M) [application/x-debian-package]

Saving to: 'tvheadend_4.2.1_armhf.deb'


tvheadend_4.2.1_armhf.deb                            100%[=======================================================================================================================>]   5.24M  7.24MB/s   in 0.7s


2017-04-27 20:13:20 (7.24 MB/s) - 'tvheadend_4.2.1_armhf.deb' saved [5490574/5490574]


다음으로 다운로드 된 파일을 설치합니다.


root@u5pvr-debian:~# dpkg -i tvheadend_4.2.1_armhf.deb

(Reading database ... 74277 files and directories currently installed.)

Preparing to unpack tvheadend_4.2.1_armhf.deb ...

[ ok ] Stopping Tvheadend: tvheadend.

Unpacking tvheadend (4.2.1) over (4.1-2426~gef89ef8-dirty) ...

dpkg: dependency problems prevent configuration of tvheadend:

 tvheadend depends on dvb-apps; however:

  Package dvb-apps is not installed.


dpkg: error processing package tvheadend (--install):

 dependency problems - leaving unconfigured

Processing triggers for man-db (2.7.0.2-5) ...

Processing triggers for systemd (215-17+deb8u6) ...

Errors were encountered while processing:

 tvheadend


설치를 하게 되면 위처럼 의존성 에러가 발생합니다만 dvb-apps 가 설치되지 않아서 발생하는 문제로써 아래의 명령어로 쉽게 문제 해결이 가능합니다.


root@u5pvr-debian:~# apt-get -f install

Reading package lists... Done

Building dependency tree

Reading state information... Done

Correcting dependencies... Done

The following extra packages will be installed:

  dtv-scan-tables dvb-apps libzvbi-common libzvbi0

The following NEW packages will be installed:

  dtv-scan-tables dvb-apps libzvbi-common libzvbi0

0 upgraded, 4 newly installed, 0 to remove and 0 not upgraded.

1 not fully installed or removed.

Need to get 1582 kB of archives.

After this operation, 7584 kB of additional disk space will be used.

Do you want to continue? [Y/n]

Get:1 http://ftp.kr.debian.org/debian/ jessie/main libzvbi-common all 0.2.35-3 [61.3 kB]

Get:2 http://ftp.kr.debian.org/debian/ jessie/main libzvbi0 armhf 0.2.35-3 [241 kB]

Get:3 http://ftp.kr.debian.org/debian/ jessie/main dtv-scan-tables all 0+git20141218.b46a22c-1 [226 kB]

Get:4 http://ftp.kr.debian.org/debian/ jessie/main dvb-apps armhf 1.1.1+rev1500-1 [1054 kB]

Fetched 1582 kB in 0s (1636 kB/s)

Selecting previously unselected package libzvbi-common.

(Reading database ... 74365 files and directories currently installed.)

Preparing to unpack .../libzvbi-common_0.2.35-3_all.deb ...

Unpacking libzvbi-common (0.2.35-3) ...

Selecting previously unselected package libzvbi0:armhf.

Preparing to unpack .../libzvbi0_0.2.35-3_armhf.deb ...

Unpacking libzvbi0:armhf (0.2.35-3) ...

Selecting previously unselected package dtv-scan-tables.

Preparing to unpack .../dtv-scan-tables_0+git20141218.b46a22c-1_all.deb ...

Unpacking dtv-scan-tables (0+git20141218.b46a22c-1) ...

Selecting previously unselected package dvb-apps.

Preparing to unpack .../dvb-apps_1.1.1+rev1500-1_armhf.deb ...

Unpacking dvb-apps (1.1.1+rev1500-1) ...

Processing triggers for man-db (2.7.0.2-5) ...

Processing triggers for desktop-file-utils (0.22-1) ...

Processing triggers for mime-support (3.58) ...

Setting up libzvbi-common (0.2.35-3) ...

Setting up libzvbi0:armhf (0.2.35-3) ...

Setting up dtv-scan-tables (0+git20141218.b46a22c-1) ...

Setting up dvb-apps (1.1.1+rev1500-1) ...

Setting up tvheadend (4.2.1) ...

[ ok ] Starting Tvheadend: tvheadend.

Processing triggers for libc-bin (2.19-18+deb8u7) ...

root@u5pvr-debian:~#


tvheadend 웹 UI 로 접근해 보겠습니다.


업그레이드가 완료 되었습니다. 감사합니다.


http://cafe.naver.com/mk802/20556


안녕하세요. 이번에는 리눅스 펌웨어의 설치 및 백업 복구 방법에 대해서 알아볼 예정입니다.


리눅스 펌웨어의 경우 초기 배포 이후 거의 업데이트가 없을 예정입니다. 크리티컬한 에러가 있을 경우에만 패치가 이루어질 예정입니다.


설치 이미지의 경우 윈도우 복구 이미지라고 생각하시면 편하실 것 같습니다.


0. 설치 파일 정보


(링크 미공개)


위 링크로 이동하시면 update.zip 파일들이 있습니다.


위 파일은 리눅스 펌웨어를 초기에 설치할 경우나 리눅스 펌웨어를 초기화 하고 싶으실 경우에 사용하는 update.zip 파일 입니다.


위는 현 리눅스 환경을 백업하시고 싶으실 때 사용하는 update.zip 파일입니다. 왼쪽이 백업할 경우 사용하는 파일, 오른쪽이 백업된 파일을 설치하는 update.zip 파일입니다.


아쉽게도 update.zip 파일을 선택하여 설치하는 방식이 U5PVR 에 지원이 되지 않는 상황이기 때문에 USB 에 파일을 넣으시고 update.zip 이라고 이름을 바꾸어 설치를 하셔야 합니다.


만약에 위 처럼 USB 에 복사한다고 할 경우 파일이름을 update.zip 으로 바꾸신 다음에 작업을 하셔야합니다.


(차후에 좋은 방법이 있다면 글을 수정하도록 하겠습니다.


1. 리눅스 펌웨어 신규 설치하기


기본적으로 U5PVR 을 받으시면 리눅스 펌웨어가 설치되어 있지 않은 상태입니다. 설치를 하실 경우 0번 에서 update-0327-linux-final.zip 파일을 받으신 다음에 USB 에 넣고 이름을 update.zip 으로 바꾸어 주시면 됩니다.


U5PVR 의 전원을 뒤쪽에 있는 스위치를 통해 끄고 아래의 방법 중 하나를 이용하여 설치를 하시면 됩니다.


1. 뒤쪽 전원 스위치를 통해 전원을 키신 다음에 리모컨으로 OK 버튼을 여러번 눌러줍니다. 그러면 액정에 UPDATE 라는 글자가 표시되고 업데이트가 진행이 됩니다. (U5PVR 슬림 및 디럭스 모두 가능)


2. 앞 쪽의 전원 스위치를 누른 상태에서 뒤쪽의 전원스위치를 통해 U5PVR 전원을 킵니다. 그러면 액정에 UPDATE 라는 글자가 표시되고 업데이트가 진행이 됩니다. (U5PVR 디럭스만 가능)


영상으로 보여 드리도록 하겠습니다.


<동영상>


업데이트가 진행되면 여느와 동일하게 U5PVR 이 동작하고 백그라운드로 리눅스가 동작하게 됩니다.


2. 리눅스 펌웨어 현 상태 백업하기


0번 링크에서 update-backup-linux.zip 파일을 받습니다. USB 에 넣고 파일 이름을 update.zip 으로 바꾼 다음에 1번의 설치 방법을 참고하여 설치를 진행합니다.


설치를 진행하게 되면 SDCARD -> config_linux -> linux_backup.tar 파일이 생성됩니다.

(U5PVR 자체 내장 ROM 용량이 부족하면 백업에 실패할 수 있습니다.)


다음으로 SDCARD -> config_linux 폴더 전체를 다른 곳에 백업하시면 되겠습니다.


config_linux 폴더를 복사하실 때 삼바를 이용해 주시면 편리합니다.


차후에 안드로이드를 초기화 하거나 업데이트가 있을 경우 data 파티션을 포맷해야하는 경우가 생기는데, 이 경우 사용해 주시면 됩니다.


3. 리눅스 펌웨어 백업 본 설치하기


SDCARD 최상단에 백업해 둔 config_linux 폴더를 복사합니다.


그 후 update-install-backup-linux.zip 파일을 통해 update 를 하시면 전에 백업된 상태로 돌아오게 됩니다.


용량 부족 문제를 방지하기 위해서 linux_backup.tar 파일은 자동으로 삭제 되도록 되어 있습니다.


감사합니다.


http://cafe.naver.com/mk802/20388


안녕하세요. 이번에는 U5PVR 에 설치한 APM 서버를 활용해 보도록 하겠습니다.


1. XpressEngine 설치

2. Wordpress 설치

3. phpsysinfo 설치

4. nextcloud 설치

5. h5ai 설치


이 순서대로 진행하도록 하겠습니다.


웹 서비스 설치 과정상 가상호스트 부분은 다루지 않습니다. 가상호스트 부분은 카페의 검색을 통해서 설정해 주시면 됩니다. 대부분 사용자분들은 가상호스트가 지원되는 도메인을 사용하는것이 아니라 iptime.org 의 도메인을 사용하고 있어서 서브도메인 설정이 불가능한 상태입니다.


따라서 이번 가이드는 가상호스트 1개로 설정하는 가이드를 작성하려고 합니다.


0. 표준 시간대 맞추기


기본적으로 설정이 되어 있지 않아서 표준 시간대를 맞춰 주셔야 합니다.


root@u5pvr-debian:/mnt/sda/sda1/htdocs# dpkg-reconfigure tzdata


Current default time zone: 'Asia/Seoul'

Local time is now:      Wed Apr 12 19:28:00 KST 2017.

Universal Time is now:  Wed Apr 12 10:28:00 UTC 2017.


root@u5pvr-debian:/mnt/sda/sda1/htdocs#


시간이 맞는지 확인합니다.


root@u5pvr-debian:/mnt/sda/sda1/htdocs# date

Wed Apr 12 19:29:20 KST 2017

root@u5pvr-debian:/mnt/sda/sda1/htdocs#


1. 웹루트 옮기기


실제로 기본 웹 루트는 /var/www/html 로 지정되어 있습니다.


그러나 리눅스 펌웨어의 경우 안드로이드 파티션의 data 에 설치가 되기 때문에 실 용량은 10GB 정도로 웹서버를 구동하기에 용량이 쬐끔 부족합니다. 


저는 이번에 사타 하드디스크로 웹 루트를 옮겨서 가이드를 작성해 보도록 하겠습니다.

(심링크나 바인드 마운트로 해결할 수 있지만 심링크의 경우 특정 웹 서비스에 문제가 생기고 바인드 마운트의 경우 U5PVR 을 재시작할 때 마다 지정해 줘야합니다. -> 물론 스크립트로 해결이 가능합니다.)


SATA 디스크는 /mnt/sda/sda1 으로 잡혀있는 상태입니다.


사타 디스크의 경우 NTFS 파일 시스템으로 되어 있어서 특정한 웹 어플리케이션이 웹루트에 대해서 특정한 권한을 요구하거나 하게 되면 문제가 발생합니다.


해결책으로는 ext4 로 포맷하여 디스크를 붙이는 것입니다.


저는 ext4 로 포맷한 상태에서 가이드를 작성하고 있습니다.


그럼 시작합니다.


저는 /mnt/sda/sda1/htdocs 폴더를 생성하고 그 폴더를 웹루트로 사용하겠습니다.


기본적으로 웹루트를 수정하기 위해서는 아래의 수정과정을 거쳐야 합니다.


일단 웹루트로 사용될 폴더를 지정합니다.


root@u5pvr-debian:~# mkdir /mnt/sda/sda1/htdocs

root@u5pvr-debian:~#


다음으로 /etc/apache2/apache2.conf 파일과 /etc/apache2/sites-enabled/000-default.conf 파일을 수정합니다.


root@u5pvr-debian:~# nano /etc/apache2/apache2.conf


# 쭉 내리다 보면 아래의 부분이 있습니다.


        Options FollowSymLinks

        AllowOverride None

        Require all denied

</Directory>


<Directory /usr/share>

        AllowOverride None

        Require all granted

</Directory>


<Directory /mnt/sda/sda1/htdocs>    <-- 경로를 수정합니다.

        Options Indexes FollowSymLinks

        AllowOverride None

        Require all granted

</Directory>


#<Directory /srv/>

#       Options Indexes FollowSymLinks

#       AllowOverride None


root@u5pvr-debian:~# nano /etc/apache2/sites-enabled/000-default.conf


<VirtualHost *:80>
        # The ServerName directive sets the request scheme, hostname and port t$
        # the server uses to identify itself. This is used when creating
        # redirection URLs. In the context of virtual hosts, the ServerName
        # specifies what hostname must appear in the request's Host: header to
        # match this virtual host. For the default virtual host (this file) this
        # value is not decisive as it is used as a last resort host regardless.
        # However, you must set it for any further virtual host explicitly.
        #ServerName www.example.com

        ServerAdmin webmaster@localhost
        DocumentRoot /mnt/sda/sda1/htdocs    <-- 이 부분을 수정합니다.

        # Available loglevels: trace8, ..., trace1, debug, info, notice, warn,
        # error, crit, alert, emerg.
        # It is also possible to configure the loglevel for particular
        # modules, e.g.
        #LogLevel info ssl:warn


이것으로 디렉터리 설정은 끝났습니다.


추가적으로 웹서버 실행계정인 www-data 가 외장 디스크를 읽을 권한이 필요함으로 아래의 권한을 줍니다.


root@u5pvr-debian:~# adduser www-data aid_media_rw

The user `www-data' is already a member of `aid_media_rw'.


root@u5pvr-debian:~# adduser www-data aid_sdcard_r

The user `www-data' is already a member of `aid_sdcard_r'.

root@u5pvr-debian:~#


웹서버를 재시작 합니다.


root@u5pvr-debian:~# service apache2 restart

[ ok ] Restarting web server: apache2.

root@u5pvr-debian:~#


2. XE 설치하기


XE 설치파일을 공식 사이트에서 받으셔서 압축을 푸신 다음에 WinSCP 로 넣어주시거나 아니면 아래의 wget 으로 직접 받으셔도 무방합니다.


https://www.xpressengine.com/


아래 설명에서 wget 으로 받는 주소는 그떄 그때 다를 수 있습니다!!


root@u5pvr-debian:~# cd /mnt/sda/sda1/htdocs

root@u5pvr-debian:/mnt/sda/sda1/htdocs# wget http://download.xpressengine.com/download/18325662/22755789

converted 'http://download.xpressengine.com/download/18325662/22755789' (ANSI_X3.4-1968) -> 'http://download.xpressengine.com/download/18325662/22755789' (UTF-8)

--2017-04-12 19:17:13--  http://download.xpressengine.com/download/18325662/22755789

Resolving download.xpressengine.com (download.xpressengine.com)... 1.255.50.158, 1.255.50.165

Connecting to download.xpressengine.com (download.xpressengine.com)|1.255.50.158|:80... connected.

HTTP request sent, awaiting response... 200 OK

Length: 11828919 (11M) [application/zip]

Saving to: '22755789'


22755789                        100%[=======================================================>]  11.28M  11.0MB/s   in 1.0s


2017-04-12 19:17:15 (11.0 MB/s) - '22755789' saved [11828919/11828919]


root@u5pvr-debian:/mnt/sda/sda1/htdocs#


받은 파일의 압축을 풀기 위해서 unzip 패키지를 설치하고 압축을 풀어줍니다.


root@u5pvr-debian:/mnt/sda/sda1/htdocs# apt-get install unzip

Reading package lists... Done

Building dependency tree

Reading state information... Done

unzip is already the newest version.

0 upgraded, 0 newly installed, 0 to remove and 0 not upgraded.

root@u5pvr-debian:/mnt/sda/sda1/htdocs#


root@u5pvr-debian:/mnt/sda/sda1/htdocs# unzip 22755789

Archive:  22755789

   creating: xe/

   creating: xe/modules/

   creating: xe/modules/rss/

  inflating: xe/modules/rss/rss.model.php

  inflating: xe/modules/rss/rss.admin.view.php

  inflating: xe/modules/rss/rss.controller.php

  inflating: xe/modules/rss/rss.view.php

  inflating: xe/modules/rss/rss.admin.controller.php

   creating: xe/modules/rss/tpl/

  inflating: xe/modules/rss/tpl/atom10.html

.........

# 생각하시는 경로에 맞게 압축이 풀렸는지 확인합니다. 
# 저는 /mnt/sda/sda1/htdocs/xe 로 풀려고 하고 있습니다.
# 확인을 하고 받은 압축파일은 지워줍니다.

root@u5pvr-debian:/mnt/sda/sda1/htdocs# ls
22755789  xe
root@u5pvr-debian:/mnt/sda/sda1/htdocs# cd xe
root@u5pvr-debian:/mnt/sda/sda1/htdocs/xe# ls
CONTRIBUTING.md  LICENSE    addons  classes               common         config     layouts  m.layouts  widgets
COPYRIGHT        README.md  admin   codeception.dist.yml  composer.json  index.php  libs     modules    widgetstyles
root@u5pvr-debian:/mnt/sda/sda1/htdocs/xe# cd ..
root@u5pvr-debian:/mnt/sda/sda1/htdocs# rm 22755789
root@u5pvr-debian:/mnt/sda/sda1/htdocs#

# www-data 로 소유자 및 그룹을 설정합니다.
root@u5pvr-debian:/mnt/sda/sda1/htdocs# chown www-data:www-data -R xe


다음으로 phpmyadmin 으로 접근하여 xpressengine 에 사용할 DB 를 하나 생성합니다.


다음 http://u5pvr_ip_address/xe 로 접근하여 xe 설치를 진행합니다.


아래의 오류가 뜨면 퍼미션을 한번 확인해 주시길 바랍니다.


아래의 정보를 입력합니다.


호스트네임을 꼭 localhost 로 해 주시길 바랍니다.


초기 계정 설정을 합니다.


정상적으로 설치가 완료 되었습니다.


대시보드 입니다.


쉬운설치도 잘 동작합니다.


이렇게 XE 를 설치해서 운용이 가능합니다.


차후에 속도 테스트 겸 제가 테스트 페이지를 하나 올리도록 하겠습니다.


3. php 를 통한 업로드 용량 제한 해결하기


기본적으로 php 업로드 용량이 2MB 로 제한이 되어 있습니다.


이 문제를 해결하기 위해서 아래의 설정을 진행합니다.


(실제로 3GB 도 업로드 해 보았습니다만 그 이상의 용량도 올락가는 지는 모르겠네요.)


php.ini 파일이 내용이 길기 때문에 F6 을 통해 검색 후 수정을 해 주시면 편리합니다.

(차후에 기초 쉘 사용법 강좌가 올라갈 예정입니다.)


아래와 같이 값을 수정하고 아파치 서버를 재시작하면 업로드 용량 제한이 16GB 로 바뀌었음을 볼 수 있습니다.

한편 업로드 관련하여 tmp 디렉터리가 내부 SD카드에 존재하면 


초기에 업로드 진행시 내장 SD카드로 업로드 되었다가 -> 지정한 디렉터리로 옮겨가기 때문에 이 오버헤드를 줄이기 위해서 아래와 같이 설정합니다.


root@u5pvr-debian:~# mkdir /mnt/sda/sda1/tmp

root@u5pvr-debian:~# chmod 777 /mnt/sda/sda1/tmp

root@u5pvr-debian:~# nano /etc/php5/apache2/php.ini


max_input_time = 86400

max_execution_time = 86400
post_max_size = 16384M
upload_max_filesize = 16384M
upload_tmp_dir = /mnt/sda/sda1/tmp

root@u5pvr-debian:~# service apache2 restart
[ ok ] Restarting web server: apache2.
root@u5pvr-debian:~#


XE 에서 게시판 업로드 용량 제한을 체크해 보겠습니다. 실제로는 16기가 까지 올라가는지는 모르겠지만 3기가는 성공했습니다.


4. wordpress 설치하기


2번과 동일하게 워드프레스에 사용될 DB 하나를 생성합니다.


저는 wordpress 라고 생성하였습니다.


그리고 설치파일을 내려받습니다.


https://ko.wordpress.org/


아래의 과정으로 설치를 진행합니다.


다운을 받고 압축을 풀고 권한을 www-data 에 주는 과정입니다.


root@u5pvr-debian:~# cd /mnt/sda/sda1/htdocs/

root@u5pvr-debian:/mnt/sda/sda1/htdocs# wget https://ko.wordpress.org/wordpress-4.7.3-ko_KR.zip

converted 'https://ko.wordpress.org/wordpress-4.7.3-ko_KR.zip' (ANSI_X3.4-1968) -> 'https://ko.wordpress.org/wordpress-4.7.3-ko_KR.zip' (UTF-8)

--2017-04-13 19:31:06--  https://ko.wordpress.org/wordpress-4.7.3-ko_KR.zip

Resolving ko.wordpress.org (ko.wordpress.org)... 66.155.40.250, 66.155.40.249

Connecting to ko.wordpress.org (ko.wordpress.org)|66.155.40.250|:443... connected.

HTTP request sent, awaiting response... 200 OK

Length: 9218185 (8.8M) [application/zip]

Saving to: 'wordpress-4.7.3-ko_KR.zip'


wordpress-4.7.3-ko_ 100%[=====================>]   8.79M  3.44MB/s   in 2.6s


2017-04-13 19:31:10 (3.44 MB/s) - 'wordpress-4.7.3-ko_KR.zip' saved [9218185/9218185]


root@u5pvr-debian:/mnt/sda/sda1/htdocs# unzip wordpress-4.7.3-ko_KR.zip
root@u5pvr-debian:/mnt/sda/sda1/htdocs# chown www-data:www-data -R wordpress
root@u5pvr-debian:/mnt/sda/sda1/htdocs#


설치를 위해 http://u5pvr_ip_address/wordpress 로 접근합니다.


DB 설정을 진행합니다.


사용하실 DB 이름과 mysql 계정을 입력하세요.


(항상 저는 테스트용이기 때문에 root로 설정해 둡니다. 보안을 위해서라면 아니지요 ㅎㅎ)


사이트 설정을 진행합니다.


설치가 다 되면 아래처럼 로그인 창이 뜹니다.


로그인 후에는 대시보드가 뜨네요.


테스트로 게시글 하나 작성해 보았습니다. 


첨부파일로 피스파이스 9.1 을 첨부했네요..


잘 됩니다.


5. phpsysinfo 설치하기


phpsysinfo 는 시스템 정보를 웹으로 보여주는 웹 어플리케이션입니다.


http://phpsysinfo.github.io/phpsysinfo/


아래의 방법으로 설치를 진행합니다.


root@u5pvr-debian:/mnt/sda/sda1/htdocs# wget https://github.com/phpsysinfo/phpsysinfo/archive/v3.2.7.zip

converted 'https://github.com/phpsysinfo/phpsysinfo/archive/v3.2.7.zip' (ANSI_X3.4-1968) -> 'https://github.com/phpsysinfo/phpsysinfo/archive/v3.2.7.zip' (UTF-8)

--2017-04-13 19:42:57--  https://github.com/phpsysinfo/phpsysinfo/archive/v3.2.7.zip

Resolving github.com (github.com)... 192.30.255.112, 192.30.255.113

Connecting to github.com (github.com)|192.30.255.112|:443... connected.

HTTP request sent, awaiting response... 302 Found

Location: https://codeload.github.com/phpsysinfo/phpsysinfo/zip/v3.2.7 [following]

converted 'https://codeload.github.com/phpsysinfo/phpsysinfo/zip/v3.2.7' (ANSI_X3.4-1968) -> 'https://codeload.github.com/phpsysinfo/phpsysinfo/zip/v3.2.7' (UTF-8)

--2017-04-13 19:42:58--  https://codeload.github.com/phpsysinfo/phpsysinfo/zip/v3.2.7

Resolving codeload.github.com (codeload.github.com)... 192.30.253.121, 192.30.253.120

Connecting to codeload.github.com (codeload.github.com)|192.30.253.121|:443... connected.

HTTP request sent, awaiting response... 200 OK

Length: unspecified [application/zip]

Saving to: 'v3.2.7.zip'


v3.2.7.zip                          [            <=>                                         ]   1.24M   497KB/s   in 2.6s


2017-04-13 19:43:02 (497 KB/s) - 'v3.2.7.zip' saved [1298976]


root@u5pvr-debian:/mnt/sda/sda1/htdocs#


root@u5pvr-debian:/mnt/sda/sda1/htdocs# unzip v3.2.7.zip

Archive:  v3.2.7.zip

47a06bb5baa48c7a0d6d0b05eb6cd2a4724f4345

   creating: phpsysinfo-3.2.7/

 extracting: phpsysinfo-3.2.7/.gitignore

  inflating: phpsysinfo-3.2.7/.htaccess

  inflating: phpsysinfo-3.2.7/.travis.yml

  inflating: phpsysinfo-3.2.7/CHANGELOG.md

  inflating: phpsysinfo-3.2.7/COPYING

  inflating: phpsysinfo-3.2.7/Dockerfile

  inflating: phpsysinfo-3.2.7/README.md

........

# 제가 원하는 웹 URL 모양과 다르기 때문에 mv 명령으로 이름을 바꿉니다.
root@u5pvr-debian:/mnt/sda/sda1/htdocs# ls
22755789  phpsysinfo-3.2.7  v3.2.7.zip  wordpress  wordpress-4.7.3-ko_KR.zip  xe
root@u5pvr-debian:/mnt/sda/sda1/htdocs# mv phpsysinfo-3.2.7/ phpsysinfo
root@u5pvr-debian:/mnt/sda/sda1/htdocs# chown www-data:www-data -R phpsysinfo/
root@u5pvr-debian:/mnt/sda/sda1/htdocs#


http://u5pvr_ip_address/phpsysinfo 로 이동하여 확인해 봅니다.


아래처럼 에러가 발생합니다.


이 문제는 config 파일을 설정해 주지 않아서 발생하는 문제인데 저는 기본 셋팅값을 쓰도록 하겠습니다.


root@u5pvr-debian:/mnt/sda/sda1/htdocs# cd phpsysinfo/

root@u5pvr-debian:/mnt/sda/sda1/htdocs/phpsysinfo# ls

CHANGELOG.md  README.md         data      index.php  language            phpsysinfo3.xsd  sample     xml.php

COPYING       README_PLUGIN.md  gfx       js         phpsysinfo.ini.new  plugins          templates

Dockerfile    composer.json     includes  js.php     phpsysinfo.xslt     read_config.php  tools

root@u5pvr-debian:/mnt/sda/sda1/htdocs/phpsysinfo# mv phpsysinfo.ini.new phpsysinfo.ini

root@u5pvr-debian:/mnt/sda/sda1/htdocs/phpsysinfo#


다시한번 접근해 봅니다.


시스템 정보가 일목요연하게 뜹니다 ㅎㅎ


6. nextcloud 설치하기


nextcloud 는 설정할 것이 매우 많습니다만 이번 가이드는 아주 간단히만 작성합니다.


https://nextcloud.com/


아래처럼 설치를 진행합니다.


먼저 사용할 DB 를 만듭니다. 저는 nextcloud 로 만들었습니다.


root@u5pvr-debian:/mnt/sda/sda1/htdocs# wget https://download.nextcloud.com/server/releases/nextcloud-11.0.2.zip

converted 'https://download.nextcloud.com/server/releases/nextcloud-11.0.2.zip' (ANSI_X3.4-1968) -> 'https://download.nextcloud.com/server/releases/nextcloud-11.0.2.zip' (UTF-8)

--2017-04-13 19:52:20--  https://download.nextcloud.com/server/releases/nextcloud-11.0.2.zip

Resolving download.nextcloud.com (download.nextcloud.com)... 88.198.160.133

Connecting to download.nextcloud.com (download.nextcloud.com)|88.198.160.133|:443... connected.

HTTP request sent, awaiting response... 200 OK

Length: 50553989 (48M) [application/zip]

Saving to: 'nextcloud-11.0.2.zip'


nextcloud-11.0.2.zip            100%[=======================================================>]  48.21M  3.51MB/s   in 16s


2017-04-13 19:52:38 (3.04 MB/s) - 'nextcloud-11.0.2.zip' saved [50553989/50553989]


root@u5pvr-debian:/mnt/sda/sda1/htdocs# chown www-data:www-data -R nextcloud

root@u5pvr-debian:/mnt/sda/sda1/htdocs#


http://u5pvr_ip_address/nextcloud 로 이동하여 설치를 진행합니다.


아래처럼 php5-curl 모듈이 설치되지 않았다고 설치가 진행되지 않네요. 


그래서 설치를 진행하고 다시 접근합니다.


root@u5pvr-debian:/mnt/sda/sda1/htdocs# apt-get install php5-curl

Reading package lists... Done

Building dependency tree

Reading state information... Done

The following NEW packages will be installed:

  php5-curl

0 upgraded, 1 newly installed, 0 to remove and 0 not upgraded.

Need to get 24.8 kB of archives.

After this operation, 64.5 kB of additional disk space will be used.

Get:1 http://ftp.debian.org/debian/ jessie/main php5-curl armhf 5.6.29+dfsg-0+deb8u1 [24.8 kB]

Fetched 24.8 kB in 1s (23.3 kB/s)

Selecting previously unselected package php5-curl.

(Reading database ... 29295 files and directories currently installed.)

Preparing to unpack .../php5-curl_5.6.29+dfsg-0+deb8u1_armhf.deb ...

Unpacking php5-curl (5.6.29+dfsg-0+deb8u1) ...

Processing triggers for libapache2-mod-php5 (5.6.29+dfsg-0+deb8u1) ...

Setting up php5-curl (5.6.29+dfsg-0+deb8u1) ...


Creating config file /etc/php5/mods-available/curl.ini with new version

php5_invoke: Enable module curl for apache2 SAPI

php5_invoke: Enable module curl for cli SAPI

Processing triggers for libapache2-mod-php5 (5.6.29+dfsg-0+deb8u1) ...


root@u5pvr-debian:/mnt/sda/sda1/htdocs# service apache2 restart

[ ok ] Restarting web server: apache2.

root@u5pvr-debian:/mnt/sda/sda1/htdocs#


설치가 잘 진행됩니다. 관리자 계정정보를 입력해 주세요.


DB 설정입니다. 


설치가 완료되면 아래와 같이 접근이 됩니다.


관리창에 가서 시스템 정보를 보았습니다. 


추가적으로 .htaccess 부분과 https SSL 설정 등을 해야하지만 이 가이드에서는 작성하지 않도록 하겠습니다.


파일 첨부가 잘 되는지 체크하기 위해서 아래의 아이오아이 영상과 AOA 영상을 업로드 해 보았습니다.


상단에 업로드 진행바가 보입니다.


업로드가 잘 되네요 ㅎㅎ..


올린 영상은 H264 AAC 로 브라우저에서 바로 재생이 가능한 코덱입니다.


(nextcloud 에서 트랜스코딩을 제공하진 않습니다. 웹에서 바로 재생가능한 코덱만 재생이 됩니다.)


7. h5ai 설치하기


h5ai 는 디렉터리를 리스팅하는 기능을 php 기반으로 예쁘게 만들어 주는 어플리케이션입니다.


https://larsjung.de/h5ai/


설정은 아래와 같이 진행합니다.


실은 DirectoryIndex 에 아래의 값을 추가해야합니다.


root@u5pvr-debian:~# nano /etc/apache2/mods-enabled/dir.conf


<IfModule mod_dir.c>

        DirectoryIndex index.html index.cgi index.pl index.php index.xhtml index.htm /_h5ai/public/index.php

## 윗부분 추가

</IfModule>


# vim: syntax=apache ts=4 sw=4 sts=4 sr noet


root@u5pvr-debian:~# service apache2 restart

[ ok ] Restarting web server: apache2.


# 저는 download 라는 폴더를 사용해 보도록 하겠습니다.

root@u5pvr-debian:~# cd /mnt/sda/sda1/htdocs/

root@u5pvr-debian:/mnt/sda/sda1/htdocs# mkdir download

root@u5pvr-debian:/mnt/sda/sda1/htdocs# cd download/

root@u5pvr-debian:/mnt/sda/sda1/htdocs/download#


root@u5pvr-debian:/mnt/sda/sda1/htdocswget https://release.larsjung.de/h5ai/h5ai-0.29.0.zip

converted 'https://release.larsjung.de/h5ai/h5ai-0.29.0.zip' (ANSI_X3.4-1968) -> 'https://release.larsjung.de/h5ai/h5ai-0.29.0.zip' (UTF-8)

--2017-04-13 20:20:24--  https://release.larsjung.de/h5ai/h5ai-0.29.0.zip

Resolving release.larsjung.de (release.larsjung.de)... 95.143.172.135, 2001:1a50:11:0:5f:8f:ac87:25a

Connecting to release.larsjung.de (release.larsjung.de)|95.143.172.135|:443... connected.

HTTP request sent, awaiting response... 200 OK

Length: 118795 (116K) [application/zip]

Saving to: 'h5ai-0.29.0.zip'


h5ai-0.29.0.zip                 100%[=======================================================>] 116.01K  77.4KB/s   in 1.5s


2017-04-13 20:20:28 (77.4 KB/s) - 'h5ai-0.29.0.zip' saved [118795/118795]


root@u5pvr-debian:/mnt/sda/sda1/htdocsunzip h5ai-0.29.0.zip

Archive:  h5ai-0.29.0.zip

  inflating: _h5ai/.htaccess

  inflating: _h5ai/CHANGELOG.md

  inflating: _h5ai/README.md

  inflating: _h5ai/private/cache/README.md

  inflating: _h5ai/private/conf/l10n/af.json

  inflating: _h5ai/private/conf/l10n/bg.json

  inflating: _h5ai/private/conf/l10n/cs.json

  inflating: _h5ai/private/conf/l10n/da.json

  inflating: _h5ai/private/conf/l10n/de.json

  inflating: _h5ai/private/conf/l10n/el.json

  inflating: _h5ai/private/conf/l10n/en.json

  inflating: _h5ai/private/conf/l10n/es.json

  inflating: _h5ai/private/conf/l10n/et.json

  inflating: _h5ai/private/conf/l10n/fi.json

.............

# 파일이 제대로 배치가 되었는지 확인합니다.
# 아래와 같이 루트 최상위에 _h5ai 가 있어야 합니다.
root@u5pvr-debian:/mnt/sda/sda1/htdocsls
_h5ai  h5ai-0.29.0.zip

#권한을 할당해 줍니다.
# FTP 를 통해 해당 폴더에 파일도 올려야 함으로 권한을 777로 줍니다.
root@u5pvr-debian:/mnt/sda/sda1/htdocs# chown www-data:www-data -R download/
root@u5pvr-debian:/mnt/sda/sda1/htdocs# chmod 777 download/


테스트로 파일을 몇개 전송해 봅니다. 역시 AOA 영상과 IOI 영상입니다.


윈도우 파일탐색기를 통해 업로드 해 보았습니다.


윈도우 탐색기를 통한 업로드는 한글 깨짐이 발생되어 Filezilla 를 통해서 다시 업로드 합니다 ㅎㅎ..


(윈도우 탐색기의 언어셋 지원이 반쪽 짜리라서 해결이 불가능합니다. ㅠㅠ)


기본적으로 h5ai 도 영상이나 파일을 미리볼 수 있도록 하는 기능을 약간은 가지고 있습니다.


요정도로 APM 활용 가이드는 마치도록 하겠습니다.


감사합니다.


http://cafe.naver.com/mk802/20380


안녕하세요. 이번에는 U5PVR 에 APM 을 설치해 보도록 하겠습니다.


실제로는 apache2 + php5 + mysql 과 추가 의존성 패키지가 설치됩니다.


먼저 mysql 을 설치하고 apache2 와 php5 패키지를 설치하는 방향으로 가도록 하겠습니다.


1. mysql 설치하기


아래의 명령어를 통해 mysql 을 설치합니다.


root@u5pvr-debian:~# apt-get install mysql-server

Reading package lists... Done

Building dependency tree

Reading state information... Done

The following extra packages will be installed:

  libaio1 libdbd-mysql-perl libdbi-perl libhtml-template-perl libmysqlclient18 libterm-readkey-perl mysql-client-5.5

  mysql-common mysql-server-5.5 mysql-server-core-5.5

Suggested packages:

  libclone-perl libmldbm-perl libnet-daemon-perl libsql-statement-perl libipc-sharedcache-perl mailx tinyca

The following NEW packages will be installed:

  libaio1 libdbd-mysql-perl libdbi-perl libhtml-template-perl libmysqlclient18 libterm-readkey-perl mysql-client-5.5

  mysql-common mysql-server mysql-server-5.5 mysql-server-core-5.5

0 upgraded, 11 newly installed, 0 to remove and 0 not upgraded.

Need to get 0 B/8000 kB of archives.

After this operation, 85.0 MB of additional disk space will be used.

Do you want to continue? [Y/n]


설치과정중에 mysql root 비밀번호를 설정하는 창도 나옵니다만 저는 이미 한번 설치를 한 상태에서 가이드를 작성하고 있어서 그 부분은 빠져 있습니다. 보안 관련하여 비밀번호는 어려운 것으로 설정해 주시면 되겠습니다.


그런데 설치를 진행하게 되면 아래와 같이 에러가 발생합니다.


Preconfiguring packages ...

Selecting previously unselected package libaio1:armhf.

(Reading database ... 25829 files and directories currently installed.)

Preparing to unpack .../libaio1_0.3.110-1_armhf.deb ...

Unpacking libaio1:armhf (0.3.110-1) ...

Selecting previously unselected package mysql-common.

Preparing to unpack .../mysql-common_5.5.53-0+deb8u1_all.deb ...

Unpacking mysql-common (5.5.53-0+deb8u1) ...

Selecting previously unselected package libmysqlclient18:armhf.

Preparing to unpack .../libmysqlclient18_5.5.53-0+deb8u1_armhf.deb ...

Unpacking libmysqlclient18:armhf (5.5.53-0+deb8u1) ...

Selecting previously unselected package libdbi-perl.

Preparing to unpack .../libdbi-perl_1.631-3+b1_armhf.deb ...

Unpacking libdbi-perl (1.631-3+b1) ...

Selecting previously unselected package libdbd-mysql-perl.

Preparing to unpack .../libdbd-mysql-perl_4.028-2+deb8u2_armhf.deb ...

Unpacking libdbd-mysql-perl (4.028-2+deb8u2) ...

Selecting previously unselected package libterm-readkey-perl.

Preparing to unpack .../libterm-readkey-perl_2.32-1+b1_armhf.deb ...

Unpacking libterm-readkey-perl (2.32-1+b1) ...

Selecting previously unselected package mysql-client-5.5.

Preparing to unpack .../mysql-client-5.5_5.5.53-0+deb8u1_armhf.deb ...

Unpacking mysql-client-5.5 (5.5.53-0+deb8u1) ...

Selecting previously unselected package mysql-server-core-5.5.

Preparing to unpack .../mysql-server-core-5.5_5.5.53-0+deb8u1_armhf.deb ...

Unpacking mysql-server-core-5.5 (5.5.53-0+deb8u1) ...

Processing triggers for man-db (2.7.0.2-5) ...

Setting up mysql-common (5.5.53-0+deb8u1) ...

Selecting previously unselected package mysql-server-5.5.

(Reading database ... 26192 files and directories currently installed.)

Preparing to unpack .../mysql-server-5.5_5.5.53-0+deb8u1_armhf.deb ...

Unpacking mysql-server-5.5 (5.5.53-0+deb8u1) ...

Selecting previously unselected package libhtml-template-perl.

Preparing to unpack .../libhtml-template-perl_2.95-1_all.deb ...

Unpacking libhtml-template-perl (2.95-1) ...

Selecting previously unselected package mysql-server.

Preparing to unpack .../mysql-server_5.5.53-0+deb8u1_all.deb ...

Unpacking mysql-server (5.5.53-0+deb8u1) ...

Processing triggers for systemd (215-17+deb8u6) ...

Processing triggers for man-db (2.7.0.2-5) ...

Setting up libaio1:armhf (0.3.110-1) ...

Setting up libmysqlclient18:armhf (5.5.53-0+deb8u1) ...

Setting up libdbi-perl (1.631-3+b1) ...

Setting up libdbd-mysql-perl (4.028-2+deb8u2) ...

Setting up libterm-readkey-perl (2.32-1+b1) ...

Setting up mysql-client-5.5 (5.5.53-0+deb8u1) ...

Setting up mysql-server-core-5.5 (5.5.53-0+deb8u1) ...

Setting up mysql-server-5.5 (5.5.53-0+deb8u1) ...

[ ok ] Stopping MySQL database server: mysqld.

[FAIL] Starting MySQL database server: mysqld . . . . . . . . . . . . . . . . . . . . . . . . . . . . . . failed!

invoke-rc.d: initscript mysql, action "start" failed.

dpkg: error processing package mysql-server-5.5 (--configure):

 subprocess installed post-installation script returned error exit status 1

Setting up libhtml-template-perl (2.95-1) ...

dpkg: dependency problems prevent configuration of mysql-server:

 mysql-server depends on mysql-server-5.5; however:

  Package mysql-server-5.5 is not configured yet.


dpkg: error processing package mysql-server (--configure):

 dependency problems - leaving unconfigured

Processing triggers for libc-bin (2.19-18+deb8u7) ...

Errors were encountered while processing:

 mysql-server-5.5

 mysql-server

E: Sub-process /usr/bin/dpkg returned an error code (1)

root@u5pvr-debian:~#


이 에러를 해결하기 위해서 mysql 계정을 aid_inet 그룹에 추가를 합니다.

(안드로이드와 커널을 공유하기 때문에 소켓 권한을 주기 위해서 aid_inet 그룹에 추가를 해야합니다.


root@u5pvr-debian:~# adduser mysql aid_inet

Adding user `mysql' to group `aid_inet' ...

Adding user mysql to group aid_inet

Done.

root@u5pvr-debian:~#


추가를 하고 나서 다시 설치 명령어를 입력하여 진행합니다.


root@u5pvr-debian:~# apt-get install mysql-server

Reading package lists... Done

Building dependency tree

Reading state information... Done

mysql-server is already the newest version.

0 upgraded, 0 newly installed, 0 to remove and 0 not upgraded.

2 not fully installed or removed.

After this operation, 0 B of additional disk space will be used.

Do you want to continue? [Y/n]

Setting up mysql-server-5.5 (5.5.53-0+deb8u1) ...

[ ok ] Stopping MySQL database server: mysqld.

[ ok ] Starting MySQL database server: mysqld . ..

[info] Checking for tables which need an upgrade, are corrupt or were

not closed cleanly..

Setting up mysql-server (5.5.53-0+deb8u1) ...

root@u5pvr-debian:~#


정상적으로 설치가 완료 되었습니다.


추가적으로 이 mysql 서버를 kodi 라이브러리 sharing 용도로 사용하는 분들이 계십니다. 


공식 가이드는 이렇습니다만 제가 직접 해보지 않아서 잘 모르겠습니다.


http://kodi.wiki/view/MySQL/Setting_up_Kodi


이 부분을 하기 위해서는 mysql 바인드 설정을 127.0.0.1 이 아니라 0.0.0.0 으로 외부에서도 접근이 가능하도록 수정해 주셔야 합니다.

(여기서 말하는 외부 접속은 127.0.0.1 대역이 아닌 다른 대역에서도 접근이 가능하게 설정하는 것을 의미합니다. 공유기 포트포워딩이 되는 것이 아닙니다.)


아래의 설정파일 수정을 통해서 외부에서도 접속을 할 수 있도록 설정합니다.


root@u5pvr-debian:~# nano /etc/mysql/my.cnf


[mysqld]

#

# * Basic Settings

#

user            = mysql

pid-file        = /var/run/mysqld/mysqld.pid

socket          = /var/run/mysqld/mysqld.sock

port            = 3306

basedir         = /usr

datadir         = /var/lib/mysql

tmpdir          = /tmp

lc-messages-dir = /usr/share/mysql

skip-external-locking

#

# Instead of skip-networking the default is now to listen only on

# localhost which is more compatible and is not less secure.

bind-address            = 0.0.0.0    <-- 이 부분을 수정합니다.

#

# * Fine Tuning

#

key_buffer              = 16M

max_allowed_packet      = 16M

thread_stack            = 192K

thread_cache_size       = 8

# This replaces the startup script and checks MyISAM tables if needed

# the first time they are touched

myisam-recover         = BACKUP

#max_connections        = 100


수정 후 재시작 해 보면 아래와 같이 모든 주소에 대해서 바인딩 되어서 구동되는 mysql 데몬을 보실 수 있습니다.


root@u5pvr-debian:~# netstat -nlp | grep mysql

tcp        0      0 0.0.0.0:3306            0.0.0.0:*               LISTEN      11448/mysqld

unix  2      [ ACC ]     STREAM     LISTENING     1574065  11448/mysqld        /var/run/mysqld/mysqld.sock

root@u5pvr-debian:~#


2. apache2 + php5 및 의존성 패키지 설치하기


패키지를 하나하나 수동으로 설치하기 보다 한방에 설치하기 위해서 아래의 phpmyadmin 설치 명령어를 넣습니다.

(아쉽게도 phpmyadmin 패키지는 사용이 되지 않습니다만, 지우셔도 무방합니다.)


root@u5pvr-debian:~# apt-get install phpmyadmin

Reading package lists... Done

Building dependency tree

Reading state information... Done

The following extra packages will be installed:

  apache2 apache2-bin apache2-data apache2-utils dbconfig-common javascript-common libapache2-mod-php5 libapr1 libaprutil1

  libaprutil1-dbd-sqlite3 libaprutil1-ldap libgd3 libjs-jquery libjs-sphinxdoc libjs-underscore libmcrypt4 libonig2

  libperl4-corelibs-perl libqdbm14 libvpx1 libxpm4 lsof php-gettext php-tcpdf php5-cli php5-common php5-gd php5-json

  php5-mcrypt php5-mysql php5-readline ssl-cert

Suggested packages:

  www-browser apache2-doc apache2-suexec-pristine apache2-suexec-custom php-pear libgd-tools libmcrypt-dev mcrypt

  php5-imagick php5-user-cache openssl-blacklist

The following NEW packages will be installed:

  apache2 apache2-bin apache2-data apache2-utils dbconfig-common javascript-common libapache2-mod-php5 libapr1 libaprutil1

  libaprutil1-dbd-sqlite3 libaprutil1-ldap libgd3 libjs-jquery libjs-sphinxdoc libjs-underscore libmcrypt4 libonig2

  libperl4-corelibs-perl libqdbm14 libvpx1 libxpm4 lsof php-gettext php-tcpdf php5-cli php5-common php5-gd php5-json

  php5-mcrypt php5-mysql php5-readline phpmyadmin ssl-cert

0 upgraded, 33 newly installed, 0 to remove and 0 not upgraded.

Need to get 0 B/20.6 MB of archives.

After this operation, 70.8 MB of additional disk space will be used.

Do you want to continue? [Y/n]


중간에 apache2 를 사용할지 lighttpd 를 사용할지 물어보는 창이 뜹니다. apache2 를 선택하고 mysql root 비밀번호와 phpmyadmin db 의 root 계정 비밀번호를 설정하는 것이 나옵니다. 설정하신대로 입력해 주시면 됩니다.


설치가 완료 되었으면 http://u5pvr_ip_address/ 를 입력하여 브라우저에서 아래의 창이 열리는지 확인합니다.


다음으로 php 도 정상적으로 동작하는지 확인하기 위해서 아래의 코드로 파일을 하나 생성합니다.


웹서버 실행 계정 www-data 가 읽어야 함으로 www-data 에게 권한을 줍니다.


root@u5pvr-debian:~# nano /var/www/html/phpinfo.php


<?php phpinfo(); ?>


root@u5pvr-debian:~# chown www-data:www-data /var/www/html/phpinfo.php


다시 http://u5pvr_ip_address/phpinfo.php 를 입력하여 웹페이지에서 아래의 내용이 보이는지 확인합니다.


3. phpmyadmin 설치하기


실제로는 패키지로써 설치를 하였습니다만, 설정이 되어 있지 않은 상태입니다.


따라서 아래의 설정을 진행해야 합니다.


phpmyadmin 설정을 추가해 주는 과정입니다. 추가적으로 apache2 서비스를 재시작할 때마다 에러가 나기 때문에 ServerName 을 localhost 로 설정합니다.


root@u5pvr-debian:~# nano /etc/apache2/apache2.conf


ServerName localhost

Include /etc/phpmyadmin/apache.conf


root@u5pvr-debian:~# service apache2 restart

[ ok ] Restarting web server: apache


이후 http://u5pvr_ip_address/phpmyadmin 으로 접속하면 아래의 phpmyadmin 페이지가 열립니다.


이후 로그인을 하면 아래와 같이 관리창이 뜹니다.


차후에는 설치한 웹서버에 게시판 프로그램, NextCloud, pydio, h5ai 등등을 설치하는 방법을 작성하도록 하겠습니다.


감사합니다.

http://cafe.naver.com/mk802/20363


안녕하세요. 이번에는 TVHeadend 사용법에 대해서 알아보도록 하겠습니다.


먼저 U5PVR 에는 원하는 기능을 모두 지원하기 위해서 TVHeadend 를 2개 내장하고 있습니다.


1. TVH

http://U5PVR아이피:19981/


2. TVH

http://U5PVR아이피:9981/

아이디 : u5pvr

비밀번호 : u5pvr


1번은 내장 TVHeadend 이고 안전성과 기능성을 구비하기 위해서 커스텀 된 3.6버전을 사용하고 있습니다. 이 버전은 이온TV 에 최적화 되어 있기 때문에 기능이 제한적입니다. 


이 문제를 해결하기 위해서 리눅스 펌웨어에 TVHeadend 4.1 버전을 내장하고 있습니다. 4.1 버전에서 지원하는 내용은 아래와 같습니다.


1. HD 홈런 연동 지원

2. EPG (internal & external 지원)

3. 파이프 FFMPEG 지원


민감한 내용이기 때문에 상세한 가이드는 작성하지 않도록 하겠습니다.


이 글에서 주로 다루는 내용은 TVH 1 서버의 방송을 TVH 2 에 붙이는 것입니다.


그럼 시작합니다.


1. 접근 하기 및 superuser 계정 수정하기


아래 위치의 파일을 수정하여 계정을 바꿉니다.


root@u5pvr-debian:~# nano /home/tvheadend/tvheadend/superuser


{

"username": "u5pvr",    <-- 아이디 입력

"password": "u5pvr"    <-- 비밀번호 입력

}


그 후 tvheadend 를 재시작합니다.


root@u5pvr-debian:~# service tvheadend restart

[ ok ] Restarting Tvheadend: tvheadend.

root@u5pvr-debian:~#


그 후 변경된 아이디와 비밀번호가 바뀌었음을 알 수 있습니다.


게시글 초기의 정보대로 접근을 해 보면 아래와 같습니다.


2. TVH #1 -> TVH #2 연동하기


먼저 아래의 내용으로 스크립트 하나를 만듭니다.


root@u5pvr-debian:~# nano /usr/bin/pipe


#!/bin/bash

ffmpeg -loglevel fatal -i $1 -vcodec copy -acodec copy -fflags nobuffer -f mpegts -tune zerolatency pipe:1


다음으로 pipe 파일에 실행 권한을 주기 위해서 아래의 명령을 입력합니다.


root@u5pvr-debian:~# chmod a+x /usr/bin/pipe


이온TV 앱을 실행하여 채널 스캔을 돌립니다. (스캔이 이미 되어 있다면 하실 필요가 없습니다.)


ATV 런처에서 라이브 TV 앱을 실행합니다.


리모컨의 메뉴 버튼을 눌러서 기본설정으로 진입합니다.


맞게 설정하시고 리모컨의 빨간색 버튼으로 스캔을 합니다.


스캔이 끝나고 채널이 아래와 같이 생성되었습니다.


다음으로 TVH #1 웹 UI 로 접근하여 채널 탭에 채널이 정상적으로 생겼는지 확인합니다.


아래와 같이 정상적으로 공중파 6개의 채널이 보임을 알 수 있습니다.


플레이 버튼을 누르면 아래의 아래의 창이 뜨는데 채널을 선택해 주시고 Direct URL 을 복사합니다.


저같은 경우 각 채널마다 주소는 아래와 같이 됩니다.

(스캔한 경우마다 다릅니다. 직접 확인하셔야 합니다.)


위를 보시면 채널 아이디가 채널 갯수만큼 생성됨을 알 수 있으며 편하게는 아래처럼 플레이 버튼에 마우스를 가져다 대면 채널 아이디가 무엇인지 파악이 편하게 가능합니다.


이렇게 설정이 되어 있는 상태에서 원활이 재생을 하려면 먹스를 지정해 줘야 합니다.


그리고 TVH #1 과 TVH #2 는 동일한 장비에 있음으로 127.0.0.1 로 주소를 수정해 줍니다.


채널 수가 작으면 문제가 없으나 많으면 notepadd++ 같은 프로그램을 이용하여 일괄 수정하시면 편리합니다.


다음으로 TVH #2 에 IPTV 네트워크를 생성하여 채널을 등록해 보겠습니다.


Configuration -> DVB inputs -> Networks 로 이동하여 IPTV 네트워크를 하나 생성합니다.


이온 TV 와 충돌이 생기지 않기 위해서는 Maximum # input streams 를 1로 설정하셔야 합니다. 

U5PVR 은 튜너가 2개 있기 때문에 최대 2로 설정이 가능합니다.


다음 Muxes 로 이동하여 Add 를 하여 네트워크를 선택하시고 채널을 추가해 줍니다.


주소는 아래꼴로 넣으시면 됩니다.


그 다음 먹스 이름과 서비스 이름을 넣습니다.


아래처럼 먹스를 등록하였고 스캔 결과도 양호합니다.


스캔이 정상적으로 되었다면 서비스탭에도 자동적으로 등록이 됩니다.


서비스를 모두 선택하여 Map selected services 를 눌러 채널에 맵핑합니다.


채널에 아래처럼 맵핑이 되었습니다.


매핑된 채널을 재생해 보도록 하겠습니다.


아래처럼 팟플레이어에 연동하여 재생을 해 보았는데 재생이 잘 됩니다.


3. EPG 연동하기


EPG 는 튜너에서 들어오는 데이터로는 받을 수가 없습니다. 알려진 EPG Grabber 를 통해서 설정해 주시길 바랍니다.


저는 아래의 EPG Grabber 를 사용하였고 상세한 방법은 기술하지 않습니다.


https://github.com/wonipapa/epg2xml


# internal grabber

/usr/bin/tv_grab_XXXX 


# external grabber

/home/tvheadend/epggrab/xmltv.sock


그 다음 기본적으로 EPG 그래버가 활성화 되어 있지 않기 때문에 아래처럼 활성화를 해 주셔야합니다.


정상적으로 작업을 하였다면 아래와 같이 EPG 목록이 뜹니다.


채널과 EPG 를 매핑해 줍니다.


그 후 정상적으로 EPG 가 올라옵니다.


이에 따라 정기적으로 EPG 를 업데이트 하려고 한다면 아래처럼 cron 을 사용해 주시면 됩니다.


저는 nano 를 사용하기 때문에 nano 를 선택하였고 4시 정각에 EPG 를 업데이트 한다면 아래처럼 입력해 주시면 됩니다.


root@u5pvr-debian:~# crontab -e

no crontab for root - using an empty one


/usr/bin/select-editor: 1: /usr/bin/select-editor: gett                                                         ext: not found

 'select-editor'.

/usr/bin/select-editor: 1: /usr/bin/select-editor: gett                                                         ext: not found

  1. /bin/nano        <----

  2. /usr/bin/vim.tiny


/usr/bin/select-editor: 32: /usr/bin/select-editor: get                                                         text: not found

 1-2 [1]: 1


0 4 * * * /usr/bin/python /home/epg/epg2xml.py -i SK -s /home/tvheadend/epggrab/xmltv.sock


4. 녹화 디렉터리 지정하기


Configuration -> Recording 으로 이동합니다.


이동하여 아래처럼 설정을 진행합니다. 스트림 프로파일을 지정합니다.


다음으로 녹화 위치를 지정하고 퍼미션을 0777로 줍니다. 언어셋의 경우 한글 깨짐을 방지하기 위해서 UTF 8 로 설정을 합니다.


서브 디렉터리도 0777 로 설정을 합니다.


이외 기타 설정은 원하시는 대로 설정하시며 됩니다.


테스트로 녹화를 한번 해 보도록 하겠습니다.


정상적으로 녹화가 잘 됩니다.


5. 다른 기기와 연동하기


연동 부분은 KODI / 라이브 채널 모두 정상적으로 잘 됩니다.


이번에는 안드로이드의 TVHClient 와 연동해 보도록 하겠습니다.


포트포워딩의 경우 9981 과 9982 TCP 포트를 열어 주시면 됩니다. ㅎㅎ


https://play.google.com/store/apps/details?id=org.tvheadend.tvhclient&hl=ko


아래처럼 연결을 만듭니다.


정상적으로 연결이 되어 아래의 정보가 뜹니다.


채널 리스트를 본 화면입니다. 설정해준 EPG 가 정상적으로 뜹니다.


재생테스트를 해 보았습니다. 잘 되네요 ㅎㅎ


채널별 EPG 화면 입니다.


녹화를 한번 해 보았습니다.


녹화물을 재생해 보았습니다.


잘 재생이 됩니다.


이렇게 TVHeadend 사용 방법에 대해서 글을 마칩니다.


감사합니다.


http://cafe.naver.com/mk802/20325


안녕하세요. 이번에는 플렉스 서버를 업그레이드 하는 방법에 대해서 알아보도록 하겠습니다.


예전에는 이렇게 많이 빈번하게 업데이트가 없었는데 요즘에는 폭풍 업데이트가 있네요 ㅎㅎ..


업데이트가 있다는 알림이 뜨면 파일 다운로드 링크를 통해서 받으시면 안됩니다.


업데이트를 진행하기 위해서 아래의 명령을 SSH 에서 입력합니다.


root@u5pvr-debian:~# apt-get update && apt-get install plexmediaserver-installer

Hit http://linux-packages.resilio.com resilio-sync InRelease

Hit http://linux-packages.resilio.com resilio-sync/non-free armhf Packages

Ign http://ftp.debian.org jessie InRelease

Hit http://ftp.debian.org jessie-backports InRelease

Hit http://ftp.debian.org jessie Release.gpg

Hit http://ftp.debian.org jessie Release

Ign http://linux-packages.resilio.com resilio-sync/non-free Translation-en

Get:1 http://ftp.debian.org jessie-backports/main armhf Packages/DiffIndex [27.8 kB]

Hit https://dev2day.de jessie InRelease

Get:2 http://ftp.debian.org jessie-backports/main Translation-en/DiffIndex [27.8 kB]

Hit https://dev2day.de jessie/main armhf Packages

Hit http://ftp.debian.org jessie/main Sources

Get:3 https://dev2day.de jessie/main Translation-en [320 B]

Hit http://ftp.debian.org jessie/contrib Sources

Get:4 https://dev2day.de jessie/main Translation-en [320 B]

Hit http://ftp.debian.org jessie/non-free Sources

Hit http://ftp.debian.org jessie/main armhf Packages

Hit http://ftp.debian.org jessie/contrib armhf Packages

Hit http://ftp.debian.org jessie/non-free armhf Packages

Hit http://ftp.debian.org jessie/contrib Translation-en

Hit http://ftp.debian.org jessie/main Translation-en

Get:5 https://dev2day.de jessie/main Translation-en [320 B]

Hit http://ftp.debian.org jessie/non-free Translation-en

Get:6 https://dev2day.de jessie/main Translation-en [320 B]

Get:7 https://dev2day.de jessie/main Translation-en [320 B]

Ign https://dev2day.de jessie/main Translation-en

Fetched 55.6 kB in 17s (3171 B/s)

Reading package lists... Done

Reading package lists... Done

Building dependency tree

Reading state information... Done

plexmediaserver is already the newest version.

0 upgraded, 0 newly installed, 0 to remove and 0 not upgraded.

root@u5pvr-debian:~#


저는 이미 업데이트가 되어서 이미 최신버전이라고 나옵니다. 


이 작업 이후에 플렉스 서버가 최신버전으로 업데이트가 되어 있음을 확인하실 수 있습니다.


감사합니다.


안녕하세요. 이번에는 클라우드 동기화 대용 비트토렌트 싱크 서버를 설치해 보도록 하겠습니다.


https://www.resilio.com/


예전에는 비트토렌트 싱크라고 불렸는데 기능은 같은데 다른 회사로 인수가 된듯한 느낌입니다.


resilio sync 라고 불리네요.


비트토렌트 싱크는 동기화할 폴더를 지정해서 코드로 공유폴더를 공유한 다음 클라이언트와 클라이언트 간 토렌트 프로토콜을 통해서 파일 공유가 되는 방식입니다.


0. 활용 예시


저의 경우에는 장비가 총 3대를 사용합니다. 

1. 태블릿

2. 휴대폰

3. PC

(4. 백업 서버)


저는 학부생으로써, 수업자료들과 제가 쓴 리포트 등을 이때까지 모아오고 있습니다.

예로써 리포트를 작성한다고 합니다.


태블릿에서 리포트를 작성 하다가 저장을 합니다. 그 후 PC로 이어서 작성하려고 하려고 합니다.

이 경우에는 어쩔 수 없이 파일을 USB에 담아서 옮기거나 이메일로 보내서 다시 여는 등의 번거로운 작업을 해야합니다.


그러나 한 폴더를 비트 토렌트 싱크로 동기화를 걸어두면, 태블릿에서 작성하다가 저장된 문서는 자동으로 PC 의 지정한 폴더로 전송이 됩니다. 자동으로 동기화가 되기 때문에 PC에 그대로 앉아서 작업을 하면 됩니다.


(그러나 동시에 1개의 파일을 수정할 수는 없습니다.)


한편, 태블릿에서 작성한 문서가 PC가 전원이 꺼져있어서 동기화가 되지 않을경우에는 4번 백업서버를 통해 동기화가된 상태이기 때문에 차후에 태블릿이 꺼져있거나 하여도 4번 백업서버와 PC가 동기화 되기 때문에 문제가 없습니다.


즉, 한 폴더를 4개의 기기가 동일한 상태를 유지하는 것입니다.


아래는 제가 사용하고 있는 btsync 사진입니다.


위 사진에서 알 수 있듯이 읽기전용으로도 공유가 가능합니다.


한편, 서버에서 서버로 백업을 하고자 할 경우에도 요긴하게 사용이 됩니다. 토렌트 프로토콜을 사용하기 떄문에 속도는 굉장히 빠릅니다.


휴대폰의 경우에도 마켓에 검색을 해 보면 앱이 존재합니다.


https://play.google.com/store/apps/details?id=com.resilio.sync


휴대폰의 사진을 그대로 서버에 백업하거나 다른 컴퓨터에 동기화 하는 용도로도 사용이 가능합니다.


결론적으로는 U5PVR 에 상기 앱을 설치하는 것이나 리눅스쪽에 btsync 를 설치하는 것이나 동일한 효과입니다. btsync 는 서로가 클라이언트이고 서버가 되기 떄문입니다.


그러나 웹으로 관리를 하려는 편리함 때문에 우분투/데비안 패키지를 설치하는 것입니다.


1. btsync 패키지 설치하기


먼저 btsync 레포를 추가합니다.


root@u5pvr-debian:~# nano /etc/apt/sources.list


# debian jessie repo

deb http://ftp.debian.org/debian/ jessie main contrib non-free

deb-src http://ftp.debian.org/debian/ jessie main contrib non-free


# debian jessie backports repo

deb http://ftp.debian.org/debian jessie-backports main


# plexmediaserver repo

deb https://dev2day.de/pms/ jessie main


# btsync repo

deb http://linux-packages.resilio.com/resilio-sync/deb resilio-sync non-free

# 위의 주소를 추가합니다.


다음으로 키 값을 추가합니다.


root@u5pvr-debian:~# wget -qO - https://linux-packages.resilio.com/resilio-sync/key.asc | sudo apt-key add -

OK

root@u5pvr-debian:~#


패키지 리스트를 업데이트 하고 btsync 를 설치합니다.

공식 레포에서 설치를 하니 패키지 이름이 resilio-sync 이네요.


root@u5pvr-debian:~# apt-get update

Get:1 http://linux-packages.resilio.com resilio-sync InRelease [3730 B]

Get:2 http://linux-packages.resilio.com resilio-sync/non-free armhf Packages [477 B]

Ign http://ftp.debian.org jessie InRelease

Get:3 http://ftp.debian.org jessie-backports InRelease [166 kB]

Ign http://linux-packages.resilio.com resilio-sync/non-free Translation-en

Hit https://dev2day.de jessie InRelease

Hit https://dev2day.de jessie/main armhf Packages

Get:4 https://dev2day.de jessie/main Translation-en [320 B]

Hit http://ftp.debian.org jessie Release.gpg

Get:5 https://dev2day.de jessie/main Translation-en [320 B]

Hit http://ftp.debian.org jessie Release

Get:6 https://dev2day.de jessie/main Translation-en [320 B]

Get:7 https://dev2day.de jessie/main Translation-en [320 B]

Get:8 https://dev2day.de jessie/main Translation-en [320 B]

Ign https://dev2day.de jessie/main Translation-en

Get:9 http://ftp.debian.org jessie-backports/main armhf Packages/DiffIndex [27.8 kB]

Get:10 http://ftp.debian.org jessie-backports/main Translation-en/DiffIndex [27.8 kB]

Hit http://ftp.debian.org jessie/main Sources

Hit http://ftp.debian.org jessie/contrib Sources

Hit http://ftp.debian.org jessie/non-free Sources

Hit http://ftp.debian.org jessie/main armhf Packages

Hit http://ftp.debian.org jessie/contrib armhf Packages

Hit http://ftp.debian.org jessie/non-free armhf Packages

Hit http://ftp.debian.org jessie/contrib Translation-en

Hit http://ftp.debian.org jessie/main Translation-en

Hit http://ftp.debian.org jessie/non-free Translation-en

Get:11 http://ftp.debian.org jessie-backports/main armhf 2017-04-04-0826.17.pdiff [1118 B]

Get:12 http://ftp.debian.org jessie-backports/main armhf 2017-04-04-0826.17.pdiff [1118 B]

Get:13 http://ftp.debian.org jessie-backports/main 2017-04-04-0826.17.pdiff [312 B]

Get:14 http://ftp.debian.org jessie-backports/main 2017-04-04-0826.17.pdiff [312 B]

Fetched 227 kB in 17s (13.0 kB/s)

Reading package lists... Done


root@u5pvr-debian:~# apt-get install resilio-sync

Reading package lists... Done

Building dependency tree

Reading state information... Done

The following NEW packages will be installed:

  resilio-sync

0 upgraded, 1 newly installed, 0 to remove and 0 not upgraded.

Need to get 9292 kB of archives.

After this operation, 11.6 MB of additional disk space will be used.

Get:1 http://linux-packages.resilio.com/resilio-sync/deb/ resilio-sync/non-free resilio-sync armhf 2.4.4-1 [9292 kB]

Fetched 9292 kB in 6s (1480 kB/s)

Selecting previously unselected package resilio-sync.

(Reading database ... 27475 files and directories currently installed.)

Preparing to unpack .../resilio-sync_2.4.4-1_armhf.deb ...

Running in chroot, ignoring request.

Unpacking resilio-sync (2.4.4-1) ...

Processing triggers for systemd (215-17+deb8u6) ...

Processing triggers for man-db (2.7.0.2-5) ...

Setting up resilio-sync (2.4.4-1) ...

Starting Resilio Sync

Processing triggers for systemd (215-17+deb8u6) ...

root@u5pvr-debian:~#


다음으로 WebUI 포트를 수정하기 위해 아래의 파일을 수정합니다.


포트의 경우 U5PVR 의 경우 안드로이드 단의 oscam 이 사용중이라 사용할 수가 없습니다. 


따라서 저는 11111 포트로 할당해 보았습니다.

(마음에 드시는 포트를 할당해서 사용하시면 됩니다만 안드로이드 서비스와 겹치지 않는 것으로 사용하셔야 합니다.)


root@u5pvr-debian:~# nano /etc/resilio-sync/config.json


{

    "storage_path" : "/var/lib/resilio-sync/",

    "pid_file" : "/var/run/resilio-sync/sync.pid",


    "webui" :

    {

        "listen" : "0.0.0.0:11111"     <-- 기본적으로 포트가 8888 이나 11111 로 지정함

    }

}


포트가 현재 사용중인지 아닌지 체크하는 방법입니다.


# 80번 포트가 사용중인지 체크하기

root@u5pvr-debian:~# netstat -nlp | grep 80

tcp        0      0 0.0.0.0:25807           0.0.0.0:*               LISTEN      2578/com.hisilicon.

tcp        0      0 0.0.0.0:25808           0.0.0.0:*               LISTEN      2578/com.hisilicon.

tcp        0      0 0.0.0.0:25809           0.0.0.0:*               LISTEN      2578/com.hisilicon.

tcp        0      0 0.0.0.0:8008            0.0.0.0:*               LISTEN      3233/com.google.and

tcp        0      0 0.0.0.0:25806           0.0.0.0:*               LISTEN      2578/com.hisilicon.

tcp6       0      0 127.0.0.1:58480         :::*                    LISTEN      18717/com.google.an

tcp6       0      0 :::8080                 :::*                    LISTEN      5042/java

tcp6       0      0 :::80                   :::*                    LISTEN      3726/apache2

tcp6       0      0 127.0.0.1:8005          :::*                    LISTEN      5042/java

tcp6       0      0 :::8009                 :::*                    LISTEN      3233/com.google.and

unix  2      [ ACC ]     STREAM     LISTENING     16932    3480/daemonsu:10075 @eu.chainfire.supersu:10075


# 32400 포트가 사용중인지 체크하기

root@u5pvr-debian:~# netstat -nlp | grep 32400

tcp        0      0 0.0.0.0:32400           0.0.0.0:*               LISTEN      4851/Plex Media Ser


# 8080 포트가 사용중인지 체크하기

root@u5pvr-debian:~# netstat -nlp | grep 8080

tcp6       0      0 :::8080                 :::*                    LISTEN      5042/java


# 사용중이지 않은 경우 아무것도 출력되지 않습니다.

root@u5pvr-debian:~# netstat -nlp | grep 1234

root@u5pvr-debian:~#


데몬 실행 권한을 root 권한으로 실행하기 위해 아래의 설정을 진행합니다.


root@u5pvr-debian:~# nano /etc/init.d/resilio-sync


#!/bin/sh

### BEGIN INIT INFO

# Provides: resilio-sync

# Required-Start: $local_fs $remote_fs

# Required-Stop: $local_fs $remote_fs

# Should-Start: $network

# Should-Stop: $network

# Default-Start: 2 3 4 5

# Default-Stop: 0 1 6

# Short-Description: daemonized version of resilio-sync.

# Description: Starts the resilio-sync daemon.

### END INIT INFO


DAEMON=/usr/bin/rslsync

SYNC_USER=root    <-- root 로 수정합니다.

CONFIG=/etc/resilio-sync/config.json


. /lib/lsb/init-functions


wait_process()

{

    while kill -0 "$1" 2> /dev/null; do

        sleep 0.5

    done

}

    done
}


start()
{
    echo "Starting Resilio Sync"
    mkdir -p /var/run/resilio-sync
    chown -R $SYNC_USER:$SYNC_USER /var/run/resilio-sync
    start-stop-daemon --start --quiet -b -o -c $SYNC_USER -u $SYNC_USER --exec $DAEMON --umask 0000 -- --config $CONFIG
}

# umask 값을 0000 으로 설정합니다.

stop()
{
    start-stop-daemon --stop -o -c $SYNC_USER -K -u $SYNC_USER -x $DAEMON
    wait_process $(pidof $DAEMON)
}

case "$1" in
  start)
    start
    ;;
  stop)
    stop
    ;;
  restart|reload|force-reload)
      stop
.....................


설정이 끝났음으로 resilio-sync 를 재시작 합니다.


root@u5pvr-debian:~# service resilio-sync restart

Starting Resilio Sync

root@u5pvr-debian:~# netstat -nlp | grep 11111

tcp        0      0 0.0.0.0:11111           0.0.0.0:*               LISTEN      4654/rslsync

root@u5pvr-debian:~#


2. 윕UI 접근 및 설정하기


접근은 http://U5PVR아이피:포트/ 로 하시면 됩니다. 저는 포트 번호를 11111 로 했습니다.


접근을 하게 되면 초기 접속이라 아이디 비밀번호를 설정하라는 창이 뜹니다. 설정을 해 줍니다.


친근한 이름을 지어줍니다. 


설정이 끝나면 설정된 아이디와 비밀번호로 로그인을 하시면 됩니다.


정상적으로 로그인이 되었습니다.


간단한 설정을 진행합니다.


우측 상단에 톱니바퀴를 누르면 설정창이 뜹니다.


기본적으로 보여줄 위치를 지정합니다. 저는 /mnt 로 지정을 하였습니다.


3. 동기화 사용하기


테스트로 아래의 폴더를 생성해 보겠습니다.


왼쪽 상단의 Add Folder 를 눌러 폴더를 추가합니다.


추가가 완료되면 아래와 같이 공유설정이 뜹니다.


퍼미션을 설정할 수 있으며 이메일이나 바로 복사가 가능합니다.


저는 복사를 해 보도록 하겠습니다.


복사한 주소를 웹에 붙여넣으면 싱크 프로그램을 다운받으라고 창이 뜹니다.


설치를 하고 아래와 같이 추가를 누르거나 혹은 프로그램에 직접적으로 등록하여 사용하시면 됩니다.


저는 직접적으로 등록해 보겠습니다.


키를 입력하고 동기화할 폴더를 지정합니다.


추가가 완료 되면 상대측에서 승인을 해줘야 합니다. 그래서 승인 대기중이라고 뜹니다.


다시 웹 UI 로 돌아와서 승인을 체크해 줍니다.


승인을 해 주고 폴더에 파일을 추가하게 되면 동기화가 일어납니다.


정상적으로 U5PVR 내부 지정한 디렉터리에 파일이 존재함을 알 수 있습니다.


피어목록에도 잘 뜹니다.


감사합니다.


http://cafe.naver.com/mk802/20283


[DivX Converter 12편] DivX 컨버터 프로파일별 비교
안녕하세요 DivX 사용자 여러분1편 부터 11편까지 설명드린 넘나 쉬운 DivX 컨버터!! 잘 사용하고 계시...
blog.naver.com


[DivX Converter11편] 인코더 추천 및 성능비교

http://blog.naver.com/divx_korea/220951293780?viewType=pc


[DivX Converter 8편] Pro 버전이란?

http://blog.naver.com/divx_korea/220910195584


NVIDIA VIDEO CODEC SDK


A comprehensive set of APIs for hardware accelerated video encode and decode on Windows and Linux.

NVIDIA Video Codec SDK technology is used to stream video to Twitch with NVIDIA ShadowPlay


The Video Codec SDK includes a complete set of high-performance tools, samples and documentation for hardware accelerated video encode and decode on Windows and Linux.


The SDK consists of two hardware acceleration interfaces: 
  • NVENCODE API for video encode acceleration
  • NVDECODE API for video decode acceleration (formerly called NVCUVID API)

  • NVIDIA GPUs contain one or more hardware-based decoder and encoder(s) (separate from the CUDA cores) which provides fully-accelerated hardware-based video decoding and encoding for several popular codecs. With decoding/encoding offloaded, the graphics engine and the CPU are free for other operations. 

    GPU hardware accelerator engine for video decoding (referred to as NVDEC) supports faster than real-time decoding which makes it suitable to be used for transcoding applications, in addition to video playback applications.

    * Diagram represents support for the NVIDIA Pascal GPU family
    ** 4:2:2 is not natively supported on HW
    *** Support is codec dependent

    Operating SystemWindows 7, 8, 10, Server 2008 R2, Server 2012, and Linux
    DependenciesNVENCODE API - NVIDIA Quadro, Tesla, GRID or GeForce products with Kepler, Maxwell and Pascal generation GPUs. 

    NVDECODE API - NVIDIA Quadro, Tesla, GRID or GeForce products with Fermi, Kepler, Maxwell and Pascal generation GPUs. 

    GPU Support Matrix 

    NVIDIA Linux display driver 375.20 or newer
    NVIDIA Windows display driver 375.95 or newer
     

    DirectX SDK (Windows only) Optional: CUDA Toolkit 7.5
    Development EnvironmentWindows: Visual Studio 2010/2013/2015
    Linux: gcc 4.8 or higher

    Get NVIDIA Video Codec SDK


    If you are looking to make use of the dedicated decoding/encoding hardware on your GPU in an existing application you can leverage the integration already available in the FFmpeg/libav. FFmpeg/libav should be used for evaluation or quick integration, but it may not provide control over every encoder parameter. NVDECODE and NVENCODE APIs should be used for low-level granular control over various encode/decode parameters and if you want to directly tap into the hardware decoder/encoder. This access is available through the Video Codec SDK.


    For application users


    Cross-platform solution to record, convert and stream audio and video. Includes NVIDIA Video Hardware Acceleration

    • Hardware acceleration for most popular video framework
    • Leverages FFmpeg’s Audio codec, stream muxing, and RTP protocols
    • Available for Windows, Linux
    • You can now use FFMPEG to accelerate video encoding and decoding using NVENC and NVDEC, respectively.

    Learn more about FFMPEG

    For application developers

    Download Video Codec SDK 7.1


    To download, you must be a member of NVIDIA Developer - DesignWorks.

    By clicking the "Agree & Download" button below, you are confirming that you have read and agree to be bound by the SOFTWARE DEVELOPER KITS, SAMPLES AND TOOLS LICENSE AGREEMENT for use of the SDK package. The download will begin immediately after clicking on the "Agree & Download"button below.


     Windows /  Linux
     Agree & Download

    Video Codec SDK in Action

    NVIDIA GeForce NOW™ is an on-demand service that connects you to NVIDIA’s cloud-gaming supercomputers to stream PC games to your SHIELD device at up to 1080p resolution and 60 frames per second.

    Learn more about GeForce NOW

    NVIDIA GameStream™ technology brings the highest resolution PC gaming to your NVIDIA SHIELD device. It harnesses the power of GeForce® GTX™ graphics cards by accessing encoding APIs using Video Codec SDK to encode your games and cast it from your PC to your SHIELD device.>

    Learn more about NVIDIA GameStream

    Key Features of Video Codec SDK

    NVENC - Hardware-Accelerated Video Encoding

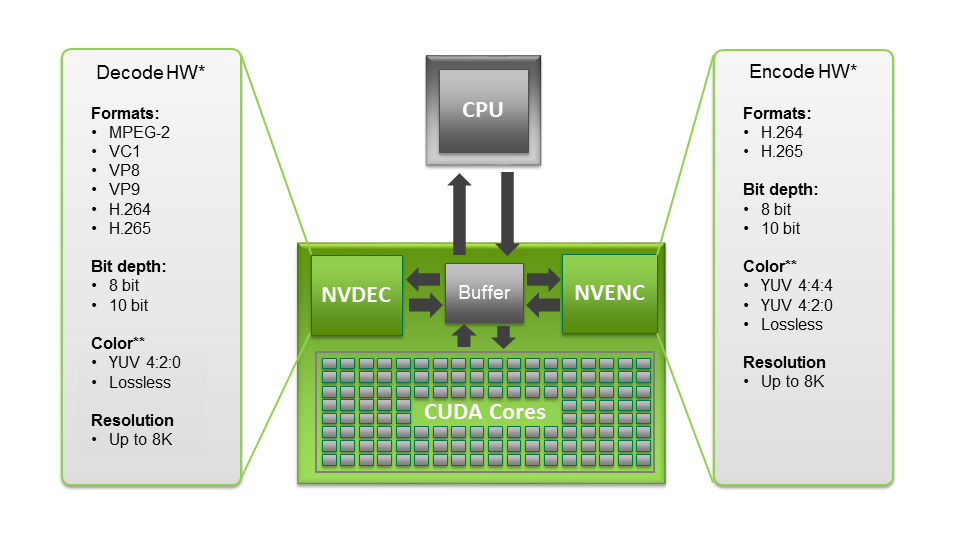
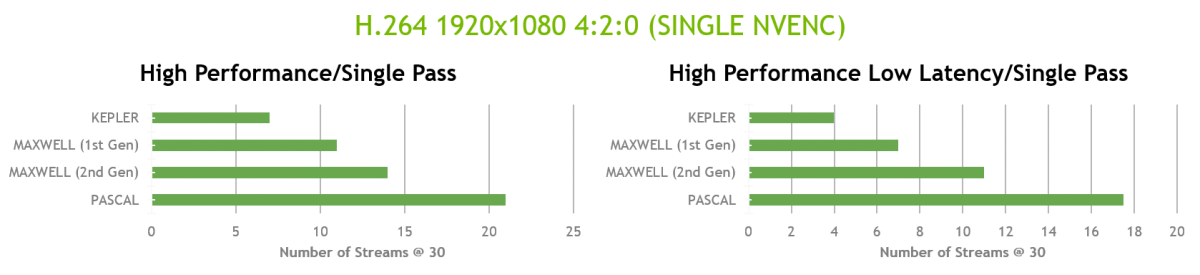
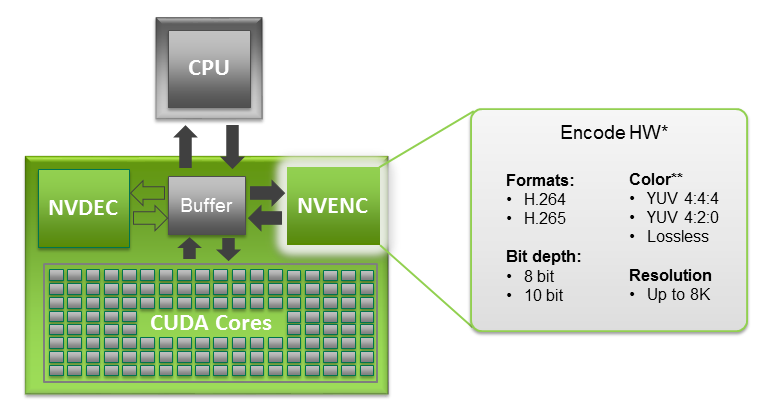
    NVIDIA GPUs - beginning with the Kepler generation - contain a hardware-based encoder (referred to as NVENC) which provides fully-accelerated hardware-based video encoding and is independent of graphics performance. With complete encoding (which is computationally complex) offloaded to NVENC, the graphics engine and the CPU are free for other operations. For example, in a game recording scenario, encoding being completely offloaded to NVENC makes the graphics engine bandwidth fully available for game rendering.

    * Diagram represents support for the NVIDIA Pascal GPU family
    ** 4:2:2 is not natively supported on HW


    GPUH.264 (AVCHD) YUV 4:2:0H.264 (AVCHD) YUV 4:4:4H.264 (AVCHD) LOSSLESSH.265 (HEVC) YUV 4:2:0H.265 (HEVC) YUV 4:4:4H.265 (HEVC) LOSSLESS
    MAX ColorMAX Res.MAX ColorMAX Res.MAX ColorMAX Res.MAX ColorMAX Res.MAX ColorMAX Res.MAX ColorMAX Res.
    Kepler8-bit4096 x 4096N/AN/AN/AN/AN/AN/AN/AN/AN/AN/A
    Maxwell (1st Gen)*8-bit4096 x 40968-bit4096 x 40968-bit4096 x 4096N/AN/AN/AN/AN/AN/A
    Maxwell (2nd Gen)8-bit4096 x 40968-bit4096 x 40968-bit4096 x 40968-bit4096 x 4096N/AN/AN/AN/A
    Maxwell (GM206)8-bit4096 x 40968-bit4096 x 40968-bit4096 x 40968-bit4096 x 40968-bit4096 x 40968-bit4096 x 4096
    Pascal8-bit4096 x 40968-bit4096 x 40968-bit4096 x 409610-bit8192 x 8192**10-bit8192 x 8192**10-bit8192 x 8192**

    * Except GM108
    ** Except GP100 (is limited to 4K resolution)

    For a full list of GPUs, encode formats and number of encoders and decoders, please see the available GPU Support Matrix

    Performance: 5X Increase over x264(CPU)

    Performance represents measured average performance and quality of different classes of videos (camcorder, gaming, screen, synthetic, and telepresence). Performance may vary based on OS and software versions, and motherboard configuration.

    Performance represents max performance and may vary based on OS and software versions, and motherboard configuration.


    NVDEC - Hardware-Accelerated Video Decoding

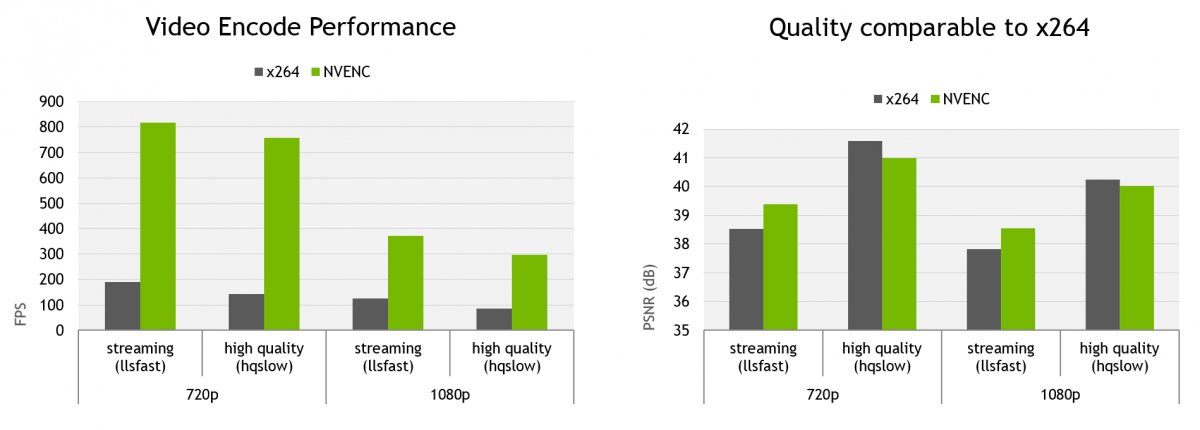
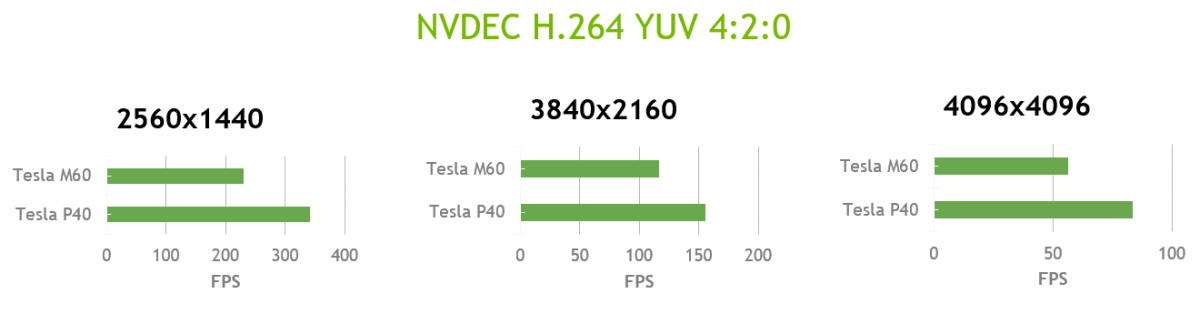
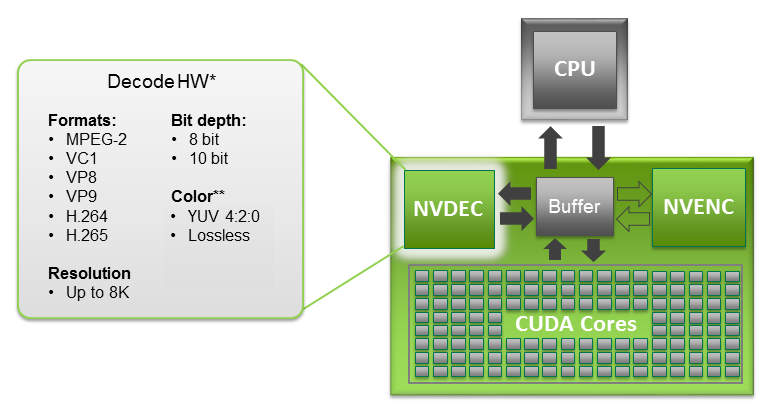
    NVIDIA GPUs contain a hardware-based decoder (referred to as NVDEC) which provides fully-accelerated hardware-based video decoding for several popular codecs. With complete decoding offloaded to NVDEC the graphics engine and the CPU are free for other operations. NVDEC supports much faster than real-time decoding which makes it suitable to be used for transcoding applications, in addition to video playback applications.

    NVDECODE API enables software developers to configure this dedicated hardware video decoder. This dedicated accelerator supports hardware-accelerated decoding of the following video codecs on Windows and Linux platforms: MPEG-2, VC-1, H.264 (AVCHD), H.265 (HEVC), VP8, VP9 (see table below for codec support for each GPU generation).

    * Diagram represents support for the NVIDIA Pascal GPU family
    ** 4:2:2 is not natively supported on HW


    GPUH.265 (HEVC)H.264 (AVCHD)VP9VP8MPEG-2VC-1
    MAX ColorMAX Res.MAX ColorMAX Res.MAX ColorMAX Res.MAX ColorMAX Res.MAX ColorMAX Res.MAX ColorMAX Res.
    KeplerN/AN/A8-bit4096 x 4096N/AN/AN/AN/A8-bit4080 x 40808-bit2048 x 1024
    Maxwell (1st Gen)N/AN/A8-bit4096 x 4096N/AN/AN/AN/A8-bit4080 x 40808-bit2048 x 1024
    Maxwell (2nd Gen)N/AN/A8-bit4096 x 4096N/AN/A8-bit4096 x 40968-bit4080 x 40808-bit2048 x 1024
    Maxwell (GM206)10-bit*4096 x 23048-bit4096 x 40968-bit4096 x 23048-bit4096 x 40968-bit4080 x 40808-bit2048 x 1024
    Pascal12-bit*8192 x 8192**8-bit4096 x 409612-bit****8192 x 8192**8-bit4096 x 4096***8-bit4080 x 40808-bit2048 x 1024

    * HEVC/VP9 10/12 bit decoding SW support coming in Video Codec SDK 8.0
    ** Max resolution support is limited to selected Pascal chips
    *** VP8 decode support is limited to selected Pascal chips
    **** VP9 10/12 bit decode support is limited to select Pascal chips

    For a full list of GPUs, decode formats and number of encoders and decoders,, please see the available GPU Support Matrix

    Performance

    For convenience, NVDECODE API documentation and sample applications are also included in the CUDA Toolkit, in addition to the Video Codec SDK.

    Note: For Video Codec SDK 7.0, NVCUVID has been renamed to NVDECODE API.


    Direct API access via Video Codec SDK

    INPUT

    There are two methods to allocate and pass input buffers to the video encoder.

    • Input buffers allocated through NVIDIA Video Encoder Interface (CPU pointer)
    • Input buffers allocated externally (Mapped Resource)

    The source content can be:

    • 8-bit YUV 4:2:0 sequence
    • 10-bit YUV 4:2:0 sequence
    • ARGB input

    For more information refer to the NVIDIA Decoder (NVDEC) Programming Guide

    OUTPUT

    Upon completion of the encoding process for an input picture, the client gets a CPU pointer to the encoded bit stream. The client can make a local copy of the encoded data or pass the CPU pointer for further processing (e.g. to a media file writer).

    The output can be:

    • H.264 (HACV) bit stream
    • H.264 Motion Estimation (ME) - Macro-block level motion vectors and intra/inter modes
    • H.265 (HEVC) bit stream
    • HEVC Motion Estimation (ME) - CTB level motion vectors and intra/inter modes
    • 8K (8192 x 8192) H.265 (HEVC) bit stream

    For more information refer to the NVIDIA Encoder (NVENC) Programming Guide

    Code Samples

    • SDK Samples Guide
    • Sample applications source code, along with Windows and Linux build files. These samples demonstrate how to use the hardware encoder and decoder.

    Documentation

    Developer Forums

    Our forum community is where Developers can ask questions, share experiences and participate in discussions with NVIDIA and other experts in the field. 
    Check out the forums here.

    Legacy Versions

    Older legacy versions of NVENC SDK and Video Codec SDK are available here.

    Additional Resources


    안녕하십니까 ?  EddyLab입니다.,

    ㅋㅋ잠자님이 U5PVR PLEX 관련으로 하기와 같이 게시글을 올려 주셨고,


    저는 실전 관련으로 Plex 관련 글을 올려 드립니다 ^^

    Plex Media Server 설정은 PC에서 하셔도 되고,
    U5PVR에서 직접 하셔도 문제 없습니다.

    기본 설정은 상기 ㅋㅋ잠자님의 강의를 기초로 설정 하신 후의 내용입니다.

    U5PVR의 크롬웹브라우저에서 리눅스 Server 관련 설정을 직접 작업합니다.
    (무선 키보드 마우스가 필요로 됩니다. ^^)

    크롬웹브라우저에서 127.0.0.1:32400/web  주소 입력을 합니다.

    가급적이면, 자주 사용하시게 될 것이므로, 별표로 북마크를 하시기 바랍니다.
    (다른 서버 관리 웹 주소도 이렇게 북마크로 관리하시면 편리합니다.) ^^

    Plex 서버 웹에서 라이브러리를 등록 합니다.

    라이브러리 목록에서 "+"를 누르시면 되겠네요..

    하기와 같이 + 라이브러리 추가 창이 뜹니다.

    라이브러리 이름을 "U5PVR방속녹화"로 적고, 언어는 한국어로 설정한 후 다음을 누릅니다.


    폴더 추가 화면으로 넘어가게 됩니다.

    하기 폴더는 U5PVR 루트 폴더로 연결 됩니다.

    저는 HDD내장 U5PVR디럭스로 test 하고 있고,
    HDD는 sda1으로 잡혀 있습니다.  그래서 sda1을 선택합니다.


    sda1 HDD에는 이미 U5PVR의 eON런처에서 녹화를 한 녹화방송은 
    pvr 이라는 폴더에 저장되게 됩니다. 


    pvr 폴더를 보면, KBS1 과 SBS 폴더가 있습니다. 
    pvr방송 녹화는 방송사명 기준 폴더 내에 녹화 저장되게 됩니다.

    라이브러리 폴더 추가는 pvr 폴더로 잡아 놓겠습니다.


    라이브라리 추가가 완료 되었습니다.

    별도로 Kodi에서 녹화를 하는 경우, 다른 경로로 녹화를 하시고 계시면,
    추가로 미디오폴더 찾아보기로 경로를 추가 하시면 됩니다.


    라이브러리 추가 후 왼쪽 라이브러리 목록에서 U5PVR방송녹화를 선택하면,
    앞서 pvr 폴더내에 있는 녹화된 방송 파일을 보여주게 됩니다.


    일단 Plex 서버 설정은 완료 되었으므로, Home으로 넘어옵니다.
    이제는 Plex 클라이언트를 실행합니다.


    Plex 클라이언트를 선택하면 계정관련 내용이 먼저 보이게 됩니다.

    저는 Plex 계정을 2개 만들어서 test를 하고 있습니다.
    Main 계정(Sever 관리 계정)이나 부 계정 어느것으로 들어가셔도 무방합니다.


    Plex 클라이언트 라이브러리 목록이 맨 위에 뜨게 됩니다.
    여기서 U5PVR방송녹화 라이브러리를 선택합니다.


    U5PVR방송녹화 라이브러리에 들어왔습니다.

    하기 녹화된 2개의 영상이 보입니다.

    만일 다음 메타데이터 plug-in이 설치 되어 있다면
    관련 녹화방송에 맞는 메타데이터를 찾아서 포스터 등을 자동으로 올려주게 됩니다.

    드라마를 녹화하면, 드라마 포스터가 뜨게 될 것 입니다.

    (주)여기서 녹화 방송이름과 Plex의 이름 설정관련 내용은 좀 더 확인을 추후에 해 보겠습니다. 


    여기서는 아직 방송 제목이 Plex 파일 네이밍 방식과 차이가 있어서
    이렇게 방송이름이 보이게 되네요.. ^^

    중요한 내용은 지상파 녹화방송 비디오 코덱은 TS이고, 오디오는 AC3라는 점입니다.

    일반 자체재생기나 Kodi에서는 포멧에 구애를 받지 않습니다만,
    Plex에서는 포멧지원에 따라서 트랜스코딩에 대한 문제 때문에 재생이 되지 않는 경우가 있습니다.

    하기에 올려드린 게시글과 같이

    Plex가 지원하는 기본 코덱만 맞춰지면(Direct Play) 몇개의 동영상을 여러 디바이스에 걸어서 동시 재생이 지원됩니다.  

    그러나, 하나라도 조건이 맞지 않으면 비디오 재생상태가 문제가 발생됩니다.

    전에 하기와 같은 내용으로 Plex 코덱 지원 내용을 올려 드린 바 있습니다.

    Plex Client : (원본보기 기준)
      Video   Audio  자막 
      TS(Mpeg2)MP4HEVCVP9AACAC3DTSSRTSMI
    U5PVRDirect Play(수정1)oo?oxxox
    Audio transcoding Only (주1)ooo
    스마트폰외장재생기
    (MXPlayer with AC3. DTS 코덱지원)
    ooo
    (주1) Audio transcoding이 진행되는 경우에는, 다른 기기에서 재생 시도시, Direct Play 조건이 아니면 재생이 안됩니다.
    (주2) SMI 자막 사용시, 4K@10bit HEVC에서는 8bit로 재생이 되는 현상이 나타났습니다.
    기본적으로 Plex를 쓰시고자 하시면, 자막은 SRT를 반드시 사용하시고, SMI to SRT 자막변환기를 사용하시기 바랍니다
    (주3) 컨텐츠를 입수하실때 Plex 사용을 고려하신다면, 비디오는 MP4 또는 HEVC / 오디오는 AAC 기준에 맞춰서 선택 다운로드하시면 무난합니다. 
    (주4)Audio에서 AC3나 DTS는 Kodi를 사용하시고, Kodi에서는 SMI자막사용도 문제없습니다.
    Kodi with Plex Add-on은 Plex와 동일한 상태에서 재생되기 때문에 상기 재생 조건을 맞추셔야 합니다.
    (주5)PC에서는 Plex 지원이 되지 않고 있습니다.
    (수정1) 170406 TS(Mpeg2)는 Direct play 재생 지원이 되는 것을 확인하였습니다.


    그래서 녹화방송은 MP2(TS)코덱이므로 전에는 비디오 트랜스코딩이 걸리고,
    오디오관련으로 AC3도 오디오 트랜스코딩이 걸릴 것입니다.


    비디오 품질 재생은 원본으로 재생 설정하였습니다.


    최근 Plex 서버 버젼이 계속 올라오고 있습니다만,
    최근 Plex 서버 버젼에서는 하기와 같이 MP2(TS)가 "직접"(Direct play)가 되는 것을
    확인 할 수 있습니다

    오디오 AC3는 트랜스코딩이 걸립니다만, U5PVR에서 재생상태에서는
    전혀 문제 없이 잘 재생되고 있습니다. 
    ((주) 물론 다수의 사용자가 동시 접속시에는 재생이 원할 하지 않을 수 있습니다.) 


    LG G5 스마트폰에서 U5PVR Plex 서버에 접속하여 동일한 녹화영상 재생을 
    Plex 클라이언트에서 재생해 보았습니다만,
    하기와 같이 비디오쪽에 트랜스코딩이 걸려서, 
    스마트폰에서 재생이 원활하지 않습니다. (하기영상은 720P로 트랜스코딩이 걸려있네요) 
    이는 기본 안드로이드 스마트폰에는 MP2(TS)코덱과 AC3코덱을 지원하지 않기 때문에
    원활한 재생이 불가능합니다. (LG G5가 CPU퍼포먼스가 높아도 이렇게 됩니다 ^^;;)

    스마트폰에서 MP2(TS)코덱과 AC3를 재생하시려면,
    외부재생기 설정을 하시고, AC3코덱 내장용 MX Player를 사용하시면
    문제 없이 재생이 됩니다.


    + Recent posts