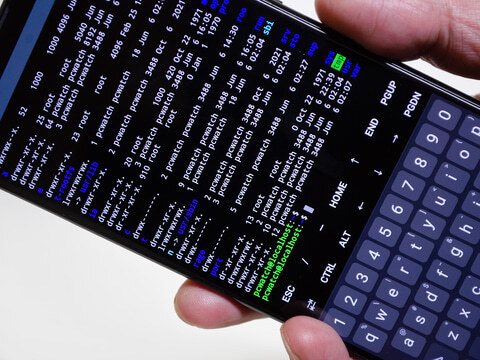
Play스토어에서 다운로드 가능한 벌써 1개 Android상 Linux!"UserLAnd"
~시작 직후부터 갑자기 Ubuntu 20.04인 환경에서 보다 편리하게
전회 소개한 "Termux"는 Play스토어에 있기는 하지만 최신 판은 F-Droid으로 함으로써 보안 측면에서 머뭇거리는 독자 분들도 많았던 것은 아닐까.거기서 이번은 100%Play스토어에서 다운로드 가능한 "UserLAnd"를 소개하고 싶다.골은 역시 Wordpress의 기동!
UserLAnd는?
"UserLAnd"는 대충은 Termux와 같다.기본적으로 단말 에뮬레이터이지만, 밖에 ssh할 뿐 아니라 내부에 Linux라이크인 시스템을 가짐으로써 위험한 root화하지 않고 Android를 탑재한 스마트 폰이나 태블릿에서 Linux를 움직일 수 있다.
이 Android기계의 Linux화, 기술적으로는 proot을 쓴 root권한을 유사하게 얻고 있다(Termux도 마찬가지). 다만 proot은 ptrace라고 불리는 자식 프로세스가 실행한 시스템 콜의 감시/제어가 이루어지므로 소의 root보다 속도가 떨어진다(특히 파일 액세스).이것이 최대의 약점이 되지만 root화하지 않고 Linux가 사용할 수 있는 것이 훨씬 이점이 있다고 생각한다.
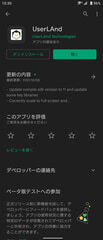
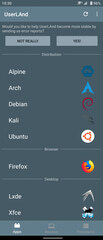
첫머리에 쓴 것처럼 Play스토어에 있어 설치는 쉽다&안심.여기요에서 인스톨 해기동. 분배에 Alpine, Arch, Debian, Kali, Ubuntu이 있고 취향에서 선택(왠지 Red Hat계열은 없다).필자는 익숙한 Ubuntu로 했는데 낯익은 것을 선택해도 좋다.그 경우 이후의 순서가 바뀌겠지만 그곳은 개인 기량으로 커버하기 바란다.
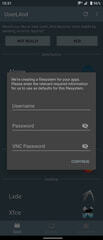
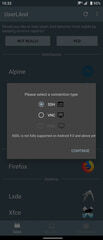
Ubuntu를 선택하면 사용자 이름, 패스워드, 그리고 vnc패스워드의 설정이 된다.앞으로도 알게 vnc에서든지 조작 가능하다.이번에는 안이한 ssh에서 조작했다.단 이것만으로 Ubuntu이 뜬다.$cat/etc/os-release에서 확인하면 버전은 20.04.4 LTS(Focal Fossa).이미 22.04가 나오는 때문에 낡은 놈이지만 이곳은 어쩔 수 없이 곳?
빨리 평상시와 다름 없는 주술 sudo apt update, sudo apt upgrade를 실행한 결과 문제 없이 완료했다.또한 Termux와는 달리 root유저가 존재하므로, 이 손의 작업은 sudo에서 할 필요가 있다.거꾸로 이쪽이 보통이라 다루기 쉬운 것이다.
$ sudo apt update
$ sudo apt upgrade
IP주소를 확인할 방법은 몇 패턴인가 있지만 필자는 그만 ifconfig라고만 치지 net-tools를 설치. 확인한 결과 192.168.11.49였다.
$ sudo apt install net-tools
$ ifconfig
wlan0: flags=4163<UP,BROADCAST,RUNNING,MULTICAST>  mtu 1500
        inet 192.168.11.49  netmask 255.255.255.0  broadcast 192.168.11.255
        unspec 00-00-00-00-00-00-00-00-00-00-00-00-00-00-00-00  txqueuelen 3000  (UNSPEC)
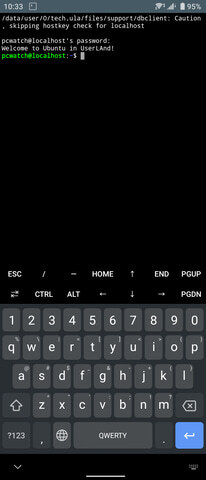
스마트 폰이라고 문자 입력이 귀찮다.Termux와 달리 이 상태에서 이미 ssh-server가 움직이다 보니 당장 ssh에서 접속한다.
knishika@M1-Macmini ~ % ssh -p 2022 pcwatch@192.168.11.49
pcwatch@192.168.11.49's password: (設定したパスワード)
pcwatch@localhost:~$
급한 편집에 필요한 vim(nano에서도 좋다)를 설치. vim에 관해서는 그 추세라면 일본어가 깨지기 때문에 조금 궁리. 이것으로 준비는 끝났다.
$ sudo apt install vim
$ vi ~/.vimrc
set encoding=utf-8
set fileencodings=iso-2022-jp,sjis,utf-8
※文字化け対策
설정 1-PHP+Apache2+MariaDB를 설치
이번에도 골은 Termux와 마찬가지로 Wordpress를 움직이는 것이다.Termux때는 PHP+Apache+MariaDB를 1개 1개 설치했지만 이번에는 한꺼번에 모두 한다고 해도 늘어놓을 뿐이므로 어려운 말은 아니다.
$ sudo apt install apache2 php php-mysql mariadb-server
확인은 Apache2부터.UserLAnd도 포트 80이 사용할 수 없기 때문에 8080으로 변경. 또 systemctl이 없어, 옛날부터의/etc/init.d/xxxx start| stop| restart| status를 사용하여 프로세스를 제어한다.출범하자 약간의 에러 메시지가 나오지만 이는 무시하고 괜찮다.
$ apache2 -v
Server version: Apache/2.4.41 (Ubuntu)
Server built:   2022-04-26T18:02:11]

$ sudo vi /etc/apache2/ports.conf
Listen 80からListen 8080
※UserLAndではport 80は扱えないため

$ sudo systemctl enable apache2
↓※ないためこちらで代用
$ sudo /etc/init.d/apache2 start

* Starting Apache httpd web server apache2                                     /usr/sbin/apache2ctl: 99: ulimit: error setting limit (Operation not permitted)
Setting ulimit failed. See README.Debian for more information.
AH00558: apache2: Could not reliably determine the server's fully qualified domain name, using 127.0.0.1. Set the 'ServerName' directive globally to suppress this message
※これは無視
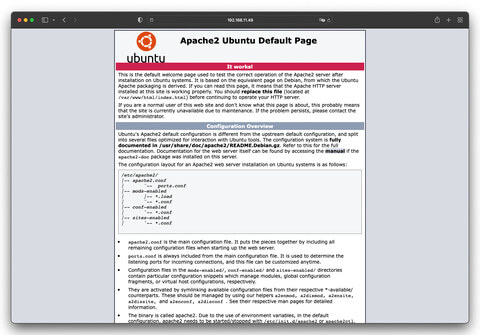
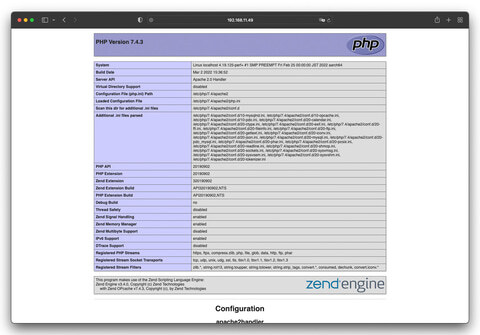
Ubuntu 20.04이므로 PHP는 7.4.3이 들어 있다.Apache2의 문서 루트는 기본적으로/var/www/html/로, 예를 들어/var/www/html/index.php를 만들<?php phpinfo()?>을 입력, 브라우저에서 작동을 확인한다.Termux에서는 php을 쓰려고 조금 궁리를 필요했지만 sudo apt install한 때에 이 주변도 서키변와쯔고 있으므로 해당 파일을 편집할 필요는 없다.
$ php -v
PHP 7.4.3 (cli) (built: Mar  2 2022 15:36:52) ( NTS )
Copyright (c) The PHP Group
Zend Engine v3.4.0, Copyright (c) Zend Technologies
    with Zend OPcache v7.4.3, Copyright (c), by Zend Technologies

$ vi /var/www/html/index.php
<?php phpinfo(); ?>
마지막은 MariaDB. 기동 후 mysql_secure_installation에서 불필요한 어카운트 등을 삭제한다.처음에 root암호를 변경 하느냐고 묻지만 여기는(Ubuntu가 관리하고 있으므로)그대로[Enter]다음 Set root password?[Y/n]n으로 한다.이후는[Enter]만 하면 된다.
$ sudo /etc/init.d/mysql start
 * Starting MariaDB database server mysqld
$ sudo mysql_secure_installation

NOTE: RUNNING ALL PARTS OF THIS SCRIPT IS RECOMMENDED FOR ALL MariaDB
      SERVERS IN PRODUCTION USE!  PLEASE READ EACH STEP CAREFULLY!

In order to log into MariaDB to secure it, we'll need the current
password for the root user.  If you've just installed MariaDB, and
you haven't set the root password yet, the password will be blank,
so you should just press enter here.

Enter current password for root (enter for none):
OK, successfully used password, moving on...

Setting the root password ensures that nobody can log into the MariaDB
root user without the proper authorisation.

Set root password? [Y/n] n
 ... skipping.

.
. ※以降全部[Enter](No)
.

Cleaning up...

All done!  If you've completed all of the above steps, your MariaDB
installation should now be secure.

Thanks for using MariaDB!
이어 DB조작용 계정과 패스워드를 설정(여기서는 admin/password!)./etc/my.cnf에 대한 기술 개발 후 Wordpress에서 사용하는 데이터베이스의 작성(여기에서는 wptest)라며 순서적으로는 Ubuntu의 그것과 같다.
$ sudo mariadb
Welcome to the MariaDB monitor.  Commands end with ; or \g.
Your MariaDB connection id is 44
Server version: 10.3.34-MariaDB-0ubuntu0.20.04.1 Ubuntu 20.04

Copyright (c) 2000, 2018, Oracle, MariaDB Corporation Ab and others.

Type 'help;' or '\h' for help. Type '\c' to clear the current input statement.

MariaDB [(none)]> GRANT ALL ON *.* TO 'admin'@'localhost' IDENTIFIED BY 'password!' WITH GRANT OPTION;
Query OK, 0 rows affected (0.004 sec)

MariaDB [(none)]> FLUSH PRIVILEGES;
Query OK, 0 rows affected (0.002 sec)

MariaDB [(none)]> exit
Bye

$ sudo vi /etc/my.cnf
[client]
default-character-set = utf8mb4
[mysqld]
character-set-server = utf8mb4
※ファイルを新規作成。デフォルト文字コードを設定

$ sudo /etc/init.d/mysql restart
 * Stopping MariaDB database server mysqld                               [ OK ]
 * Starting MariaDB database server mysqld                               [ OK ]

$ mysql -u admin -p
Enter password:
Welcome to the MariaDB monitor.  Commands end with ; or \g.
Your MariaDB connection id is 38
Server version: 10.3.34-MariaDB-0ubuntu0.20.04.1 Ubuntu 20.04

Copyright (c) 2000, 2018, Oracle, MariaDB Corporation Ab and others.

Type 'help;' or '\h' for help. Type '\c' to clear the current input statement.

MariaDB [(none)]> create database wptest;
Query OK, 1 row affected (0.003 sec)

MariaDB [(none)]> select * from INFORMATION_SCHEMA.SCHEMATA where SCHEMA_NAME='wptest';
+--------------+-------------+----------------------------+------------------------+----------+
| CATALOG_NAME | SCHEMA_NAME | DEFAULT_CHARACTER_SET_NAME | DEFAULT_COLLATION_NAME | SQL_PATH |
+--------------+-------------+----------------------------+------------------------+----------+
| def          | wptest      | utf8mb4                    | utf8mb4_general_ci     | NULL     |
+--------------+-------------+----------------------------+------------------------+----------+
1 row in set (0.005 sec)

MariaDB [(none)]>
설정 2-Wordpress를 설치하고 기동!
평소대로 Wordpress를 설치한다.최신판을 다운로드하고 전개하고 문서 루트에 wordpress폴더별 이동(이번에는 wp에 리네임 하고 있다), wp-config-sample.php를 wp-config.php에 복사하고 DB이름 등 필요한 항목을 편집한다.Termux와는 달리 localhost도 쓸 수 있고 특별한 것은 아무것도 없다.
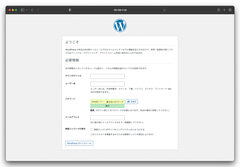
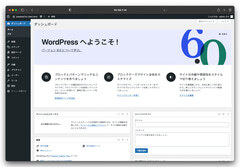
Web브라우저에서 http://192.168.11.20:8080/wp에 접속하면 셋업이 시작되어 설정한 ID/패스워드로 관리 화면에 로그인할 수 있다.
$ wget --no-check-certificate https:/ja.wordpress.org/latest-ja.tar.gz
$ tar -zxvf latest-ja.tar.gz
$ mv wordpress /var/www/html/wp
$ cd /var/www/html/wp
$ cp wp-config-sample.php wp-config.php
$ nano wp-config.php
/** WordPress のためのデータベース名 */
define( 'DB_NAME', 'wptest' );
/** MySQL データベースのユーザー名 */
define( 'DB_USER', 'admin' );
/** MySQL データベースのパスワード */
define( 'DB_PASSWORD', 'password!' );
/** MySQL のホスト名 */
define( 'DB_HOST', 'localhost' );
/**#@+
 * 認証用ユニークキー(https:/api.wordpress.org/secret-key/1.1/salt/で得られた値と入れ替える)
  */
어떨까.Termux보다 UserLAnd가 갑자기 Ubuntu 20.04가 들어 있으므로, 항상 사용하는 Ubuntu에 가까운 조작으로 Wordpress를 설정할 수 있었다.가장 큰 차이는 systemctl이 없음.여기는 옛날부터의/etc/init.d/xxxx에서 대용 가능하므로 결과적으로 문제가 없다.
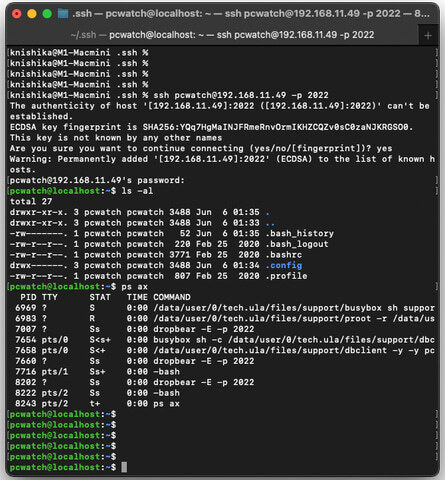
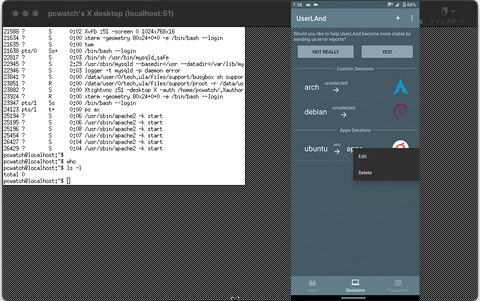
$ ps ax
  PID TTY      STAT   TIME COMMAND
 8103 ?        Ss     0:05 /usr/sbin/apache2 -k start
 8106 ?        S      0:01 /usr/sbin/apache2 -k start
 8107 ?        S      0:01 /usr/sbin/apache2 -k start
 8108 ?        S      0:01 /usr/sbin/apache2 -k start
 8109 ?        S      0:02 /usr/sbin/apache2 -k start
 8110 ?        S      0:02 /usr/sbin/apache2 -k start
14964 ?        S      0:00 /data/user/0/tech.ula/files/support/busybox sh suppor
14983 ?        R      2:03 /data/user/0/tech.ula/files/support/proot -r /data/us
15005 ?        Ss     0:01 dropbear -E -p 2022
15026 pts/0    S<s+   0:00 busybox sh -c /data/user/0/tech.ula/files/support/dbc
15032 pts/0    S<+    0:01 /data/user/0/tech.ula/files/support/dbclient -y -y pc
15034 ?        Ss     0:01 dropbear -E -p 2022
15058 pts/1    Ss+    0:01 -bash
15079 ?        Ss     0:05 dropbear -E -p 2022
15080 pts/2    Ss     0:01 -bash
22817 pts/2    S      0:00 /bin/sh /usr/bin/mysqld_safe
22945 pts/2    S      0:03 /usr/sbin/mysqld --basedir=/usr --datadir=/var/lib/my
22946 pts/2    S      0:00 logger -t mysqld -p daemon error
23371 ?        S      0:01 /usr/sbin/apache2 -k start
25194 ?        S      0:00 /usr/sbin/apache2 -k start
25195 ?        S      0:00 /usr/sbin/apache2 -k start
25196 ?        R      0:00 /usr/sbin/apache2 -k start
25454 ?        S      0:00 /usr/sbin/apache2 -k start
25936 pts/2    t+     0:00 ps ax
pcwatch@localhost:~$
간이 벤치 마크, sysbench결과는 다음과 같다.Termux에서는 왠지 886.26과 늦었지만 이번에는 3,446.30@Snapdragon 865.Snapdragon 730G가 2,534.60, Raspberry Pi4/4GB가 1,786.52이었던 것으로 타당한 결과가 나왔다.Raspberry Pi4/4GB의 두배의 속도이다.
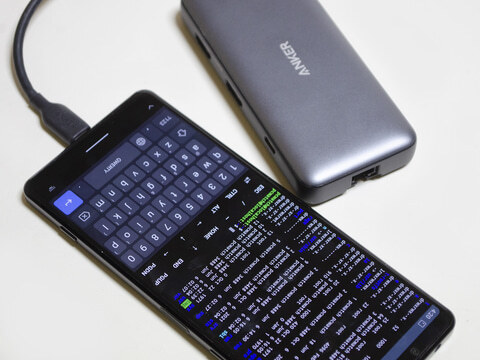
이렇게 되면 Raspberry Pi4를 외부용 Web서버에 있는 필자에게 스마트 폰의 Type-C에 전원 공급 가능하고 Ethernet이 Hub에서도 달아 고정 IP주소로 설정.서버에 하는 것도 재미 있을지도...이라고 생각한다(웃음).
sysbench --test=cpu runの結果
CPU speed:
    events per second:  3446.30

General statistics:
    total time:                          10.0011s
    total number of events:              34482

Latency (ms):
         min:                                    0.29
         avg:                                    0.29
         max:                                    1.71
         95th percentile:                        0.29
         sum:                                 9988.31

Threads fairness:
    events (avg/stddev):           34482.0000/0.00
    execution time (avg/stddev):   9.9883/0.00
git, composer는 풀린 docker는 움직이지 않는다
여기까지 움직인다면, 신나게 sudo apt install로 git, composer, docker, docker-compose 같은 개발 계열의 명령도 설치했다.
$ git --version
git version 2.25.1

$ composer --version
Composer 1.10.1 2020-03-13 20:34:27

$ docker version
Client:
 Version:           20.10.12
 API version:       1.41
 Go version:        go1.16.2
 Git commit:        20.10.12-0ubuntu2~20.04.1
 Built:             Wed Apr  6 02:16:12 2022
 OS/Arch:           linux/arm64
 Context:           default
 Experimental:      true
Cannot connect to the Docker daemon at unix://var/run/docker.sock. Is the docker daemon running?

$ docker-compose version
docker-compose version 1.25.0, build unknown
docker-py version: 4.1.0
CPython version: 3.8.10
OpenSSL version: OpenSSL 1.1.1f  31 Mar 2020
보시다시피 들어가려면 들어가지만 docker가 "Cannot connect to the Docker daemon at unix://var/run/docker.sock. Is the docker daemon running?"에서 움직이지 않는다.
sudo dockerd에서 수동 기동하면 kernal문제나 여러가지 에러가 나서서 안 되것 같다.원래 가상화 할 수 없어서 못해다고 했던가.git과 composer는 움직이는 게 먼저 설치한 Apache2+PHP+MariaDB가 있으면 다른 언어에서도)나름대로의 개발도 스마트 폰이나 태블릿으로 가능하다.
마지막으로 이번에는 ssh접속하려 했으나, 첫머리에 쓴 것처럼 vnc에서도 접속 가능하다.port는 5951. 즉 이번 패턴이라고
vnc://192.168.11.49:5951
로 접속할 수. 패스워드는 초기 기동시에 설정한 것을 사용한다.다만 보시다시피 심플하는 줄로 개인적으로는 ssh접속을 권하고 싶다.ssh/vnc의 전환은 session탭에서 삭제도 포함할 수 있다.
이상과 같이 UserLAnd는 Android탑재의 스마트 폰이나 태블릿에서 쉽게 Linux를 움직이는 단말 에뮬레이터이다.Termux와는 달리 Play스토어에서만 설치 가능 갑자기 Ubuntu를 기동할 수 있기 때문에 거의 평소대로 조작이 가능……등 Termux보다 안심하고, 그리고 위화감 없이 스마트 폰이나 태블릿에서 Linux를 쓸 수 있다.
Termux는 재미 있을 것 같지만 F-Droid에서 다운로드는 불안했던 독자 분들에 꼭 시험하고 싶은 프로그램이다.
https://pc.watch.impress.co.jp/docs/column/nishikawa/1415900.html
【西川和久の不定期コラム】 Playストアからダウンロードできるもう1つのAndroid上Linux!「UserLAnd
前回ご紹介した「Termux」は、Playストアにあるにはあるが、最新版はF-Droidと言うことで、セキュリティ面で二の足を踏んでいる読者の方も多かったのではないだろうか。そこで今回は100% Pla
pc.watch.impress.co.jp
'기타제품 및 SW' 카테고리의 다른 글
| Apple M2와 제12세대 Core P를 벤치 비교.CPU는 Core가 GPU는 M2가 우위 (0) | 2022.07.07 |
|---|---|
| Apple, Arm PC 칩 매출 90% 획득:리포트 (0) | 2022.06.20 |
| 진화한 "골 전도 완전 무선"PEACE"SS-1".Shokz와 비교 (0) | 2022.06.13 |
| 잘 토리이류"8K게이밍 시어터"에.게이밍 PC와 헤드셋이 활약 (0) | 2022.06.13 |
| Apple M2는 Mac에 더 빠른 CPU, 그래픽스 및 메모리 대역폭을 제공합니다. (8K 지원 / 8K@120fps ??? ) (0) | 2022.06.07 |