삼성 전자와 LG 전자가 2019 4K 및 8K 울트라 HD TV를 소매 용으로 공급하는 데 더 가까워 질수록 경영진은 가장 우수한 TV 시리즈의 대부분이 새로운 HDMI 2.1 사양을 지원할 것이라고 말했다.
복잡한 상황을 좀더 이해하기 쉽도록하기 위해 두 회사는 최근 새로운 HDMI 2.1 사양이 다양한 4K 및 8K QLED, OLED, NanoCell 및 LED-LCD TV를 지원한다는 점을 명확히했습니다.
우리는 각 회사의 2019 스텝 업 4K 및 8K Ultra HDTV 모델 라인에서 지원되는 계획된 HDMI 2.1 기능 목록을 아래에 제공합니다.
대부분의 모델은 기술적으로 새로운 HDMI 2.1 표준을 지원할 것입니다. 이전 버전의 HDMI 이전 버전과 마찬가지로 HDMI 2.1에서 설명 된 다양한 기능과 기능은 장치 제조업체가 포함하거나 생략 할 수 있습니다.따라서 모든 제품이 버전 2.1에 설명 된 다양한 기능을 모두 지원하는 것은 아닙니다.
지난 몇 년 동안 HDMI 2.1은 첨단 텔레비전 및 소스 구성 요소에서 가장 많이 요구되는 기능 중 하나였습니다.좋은 이유는 정통한 제품 구매자들이이 인터페이스를 통해 구매 한 TV가 앞으로 수개월에서 몇 년 후에 소개 될 수있는 새로운 외부 소스 장치와 호환 될 수 있도록 기다리고 있기 때문입니다.
지금까지 HDMI 2.1 적합성이 필요한 자격 요건을 충족한다고 주장하는 제품을 인증하기 위해 프로토콜 및 절차를 테스트하고 설정하는 작업이 오래 걸렸습니다.해당 인증이 발급 될 때까지 제품은 공식적으로 기능을 지원하지 않습니다.그러나 테스트 및 인증은 곧 수립 될 것으로 예상되며 특정 HDMI 2.1 기능은 하반기에 언젠가 나타나기 시작할 것입니다.
그러나 올해 TV에서 지원 될 기능을 예상하고 설계 한 LG, 삼성, 소니 등의 제조업체들은 곧 출시 될 특정 제품에 HDMI 2.1 지원 계획을 발표했습니다.
HDMI 2.1이 지원하는 이점 중 하나는 차세대 케이블 및 위성 TV 박스, 외부 스트리밍 미디어 플레이어, 네트워크와 같은 외부 소스 장치로 HDMI 2.1 디지털 커넥터를 통해 전달되는 4K 및 8K Ultra HD 신호의보다 견고한 영상 및 음질입니다. 부착 된 저장 장치 등
우리는 이전에 HDMI 2.1 사양이 홈 시어터에 가져다 줄 많은 새로운 기능과 성능에 대해보고했으며, 최신 고화질 비디오 (HFR) 비디오에 적합한 최고 48 Gbps 초고속 대역폭으로 마무리되었습니다. 해상도 수준.
마찬가지로 HDMI 2.1은 동적 고화질 (HDR), TV 입력 지연, 게임 콘솔과 TV 간의 즉각적이고 자동적 인 게임 모드 최적화, 지원 중단을 통한 최소한의 찢김으로 더 선명한 이미지를 제공하는보다 견고한 고해상도 비디오 게임을 지원합니다 가변 재생 빈도).
아마도 홈 시어터 애호가에게 가장 중요한 것은 HDMI 2.1 사양이 훨씬 더 향상된 eARC (Audio Return Channel) 기능을 지원한다는 것입니다.
2019 Samsung과 LG TV는 모델 시리즈 별 HDMI 2.1 기능을 지원했습니다 :
높은 프레임 속도 비디오
높은 프레임 속도 (HFR) 기능은 24 및 30fps 속도보다 높은 해상도의 비디오 신호를 허용합니다.4K / 120fps 및 8K / 60p와 같은 새로운 고속 프레임 속도는 빠른 픽셀 스포츠 경기의 고해상도 비디오를 픽셀 화와 흐려짐없이 깨끗하고 부드러운 모션 해상도로 전송할 수 있어야합니다.
삼성 TV
8K Q900R 시리즈의 삼성 TV 모델은 HDMI 2.1 연결을 통해 최대 60fps의 HFR로 8K 비디오를 지원합니다.지난해 삼성 8K Q900을 구입 한 사람들은 HDMI 2.1 이상 8K HFR을 수용 할 수있는 OneConnect Box (전문 설치)의 보드를 무료 업그레이드 할 수있을 것이라고 삼성은 말했다.
2019 년에는 4K Q90 및 8K Q900R QLED TV 시리즈 만 2019 년에 HFR (High Frame Rate) 4K Ultra HD 비디오 (4K / 120fps)를 지원합니다. Q60, Q70, Q80, Q90 및 Q900 시리즈의 모델과 9500, 9000 및 8600 시리즈 NanoCell TV는 2K 및 2.5K 해상도 (2K / 120fps, 2.5K / 120fps)로 HFR 120fps를 처리 할 수 있습니다.
LG TV
9500 및 9000 시리즈의 W9, E9, C9 시리즈 및 LG NanoCell LED-LCD TV의 LG OLED TV 모델은 HDMI 2.1 및 USB 입력 모두에서 4K HFR을 지원합니다.NanoCell 8600 시리즈의 모델은 USB 입력을 통해서만 HFR을 지원합니다.이것은 향후 펌웨어 업데이트를 통해 추가 될 예정입니다.
가변 재생률
VRR (Variable Refresh Rate)은 TV가 게임 콘솔 또는 PC와 디스플레이를 동기화하는 표준화 된 시스템입니다.Xbox One S 및 One X는 HDMI를 통해 VRR을 지원하는 최초의 장치였습니다.
삼성 TV
모든 삼성 QLED TV 시리즈 (Q60, Q70, Q80, Q90, Q900R 및 RU8000 시리즈 엣지 라이트 4K LED-LCD TV 시리즈는 VRR과 AMD의 독자적인 FreeSync (VRR과 같은 시스템으로 디스플레이와 FreeSync는 Xbox One S 및 One X 콘솔에서 지원됩니다. 게임의 프레임 속도가 변동하는 경우에도 PC 또는 콘솔이 최대 120Hz까지 올라갑니다.
LG TV
LG 전자의 W9 시리즈 4K OLED TV 시리즈는 6500 및 55 인치 화면 크기 이외에도 8600 시리즈 LG NanoCell TV 모델이나 9000을 지원하지 않으므로 VRR을 지원하지 않습니다.
ALLM
Auto Low Latency Mode (ALLM)는 XBox One S 또는 XBox One X와 같은 게임 콘솔을 허용하는 HDMI 2.1 버전에서 지정된 HDMI 기능으로, AV 수신기 및 TV 세트를 포함한 HDMI 체인의 모든 호환 가능한 호환 구성 요소를 자동으로 제어합니다. 사용자가 수동으로 TV 설정으로 들어가서 변경하지 않고도 게임 모드 또는 저 대기 시간 모드로 전환 할 수 있습니다.
삼성 TV
삼성은 모든 2019 QLED TV는 물론 RU7 및 RU8 시리즈 4K 엣지 라이트 LED-LCD TV를 포함한 모든 중급 및 고급 4K Ultra HD TV 시리즈에서 HDMI를 통해 ALLM을 지원합니다.
LG TV
LG는 2019 4K OLED TV와 2019 4K NanoCell TV Series 모델 모두에서 HDMI를 통해 ALLM을 지원합니다.
동적 HDR 메타 데이터 (SMPTE 2094)
Dynamic HDR Metadata는 소스 구성 요소에서 지원되는 TV로 전송되는 HDR 프로필 (Dolby Vision, HDR-10 + 등)의 수를 통해 수행되는 지침으로, 장면별로 밝기, 대비 및 색상 수준을 표시하는 방법을 디스플레이에 알립니다. 또는 프레임 단위로 비디오 또는 프로그램의 과정을 통해 다양한 동적 범위의 레벨을 생성 할 수 있습니다.
삼성
모든 2019 개의 삼성 QLED TV와 RU8 시리즈 4K Ultra HDTV는 HDR10 + 프로파일을 위해 HDMI를 통해 동적 메타 데이터를 지원합니다.
LG
Dolby Vision HDR 프로파일을 위해 2019 개의 모든 LG 4K OLED TV와 2019 4K NanoCell LED-LCD TV가 HDMI를 통해 Dynamic HDR Metadata를 지원합니다.
향상된 오디오 리턴 채널 (eARC)
기술적으로, 펌웨어 업데이트 날짜를 통해 HDMI 2.0b 입력이 장착 된 일부 TV에 eARC 기능을 추가 할 수 있지만 이러한 경우 구성 요소의 원래 디자인 및 포함 된 기능 패키지의 제조업체 의도에 달려 있습니다.eARC는 이전 HDMI ARC 표준보다 더 큰 대역폭을 제공합니다.또한 장치 핸드 셰이크 오류 및 병목 현상을 피할 수 있으므로 고해상도 사운드 형식이 낮은 품질의 형식으로 코드 변환 될 수 있습니다.
eARC는 오디오 대역폭을 대략표준 ARC에서 1-3 Mbps, eARC에서 37 Mbps.따라서 Dolby TrueHD 나 DTS-HD Master Audio와 같은 무손실 HD 오디오 형식으로 7.1 채널 서라운드를 전송할 수 있습니다.
또한 eARC는 소스 장치를 디스플레이에 직접 연결 한 다음 오디오를 연결된 eARC 또는 HDMI 2.1 장착 A / V 수신기 또는 사운드 바를 디코딩을 위해 전달합니다.따라서 4K Ultra HDTV 초창기에 레거시 오디오 / 비디오 HDMI 구성 요소를 손상시킨 HDR 메타 데이터 및 HDCP 2.2 콘텐츠 보호와 같은 새로운 형식 및 추가 기능이 등장함에 따라 지원되는 표준 비디오 신호 차단 문제를 피할 수 있습니다.
삼성 TV
삼성은 2019 년 TV 라인에서 HDMI 입 / 출력 연결에 eARC 지원을 포함시키지 않을 것이다.
삼성 전자 대변인 스콧 코헨 (Scott Cohen)에 따르면, eARC는 회사의 2019 년 TV에서 지원되지 않고있다. "우리는 스트리밍 세계로 이사하고 있으며 스트리밍 사이트에는 돌비 아트모스가 추가되고있다. 손실] 돌비 디지털 플러스 [형식].표준 HDMI-ARC를 통해 현재 고객을 지원할 수 있다고 생각합니다.
"Dolby Atmos가 중요한 Samsung Dolby Atmos Sound Bar가있는 삼성 전용 생태계에 종사하는 사람들을 위해 우리는이를 보완하기 위해 모든 막대에 HDMI 통과를 제공합니다."
그러나 첨단 립싱크 교정 / 문제 제거, HDMI-CEC 단독 장치보다 장치 호환성 / 상호 운용성이 더 뛰어나며, 객체가있는 사운드 트랙을 지원하는 기능을 포함하여 eARC 기능의 일부인 다른 여러 이점을 다루지는 않습니다 Dolby True HD 또는 DTS-HD Master Audio 형식에 내장 된 Dolby Amos 및 DTS : X를 지원하므로 스트리밍 서비스는 앞으로도 이러한 형식으로 전환해야합니다.이것은 또한 비디오 소스 출력을 TV에 직접 연결하고 eARC를 통해 연결된 AVR 또는 서라운드 사운드 디코더에 사운드를 전달하는 것을 배제합니다.
LG TV
eARC를 지원하지 않는 8600 2019 LG NanoCell TV 시리즈를 제외하고 대부분의 2019 LG 4K OLED (W9, E9, C9) 및 2019 4K NanoCell TV (9500 및 9000)는 HDMI 입력 2에서 eARC를 지원합니다.
LG는 자사의 8K OLED 및 LED LCD TV가 CES 2019에서 HDMI 2.1을 지원할 것이라고 밝혔지만,보다 가까운 기능 지원에 대한 자세한 내용을 제공 할 예정이다.소니, TCL, 하이 센스 (Hisense) 등이 HDMI 2.1을 제품으로 지원하고 테스팅이 가능해질 것으로 기대되는 방식에 대해 계속 지켜봐주십시오.
인텔제미니 레이크프로세서는 2016 년 9 월에 처음보고 된 직후 매우 기대되었고, 제미니 레이크 제품은 이전 버전의 아폴로 레이크 제품보다 가격이 비싸다고 약속 한 이후 출시하기 훨씬 전에 출시되었습니다.이전 세대에비해 성능 이점이뚜렷했음에도 불구하고인텔의 저렴한 프로세서가 부족하여 가격이 초기 예상치와 일치하지 않아서약간의이자가발생했습니다.
최근 몇 주 동안 우리는Tremont 마이크로 아키텍처를기반으로하며 Intel "i915"Gen11 그래픽을 특징으로하는 제미니 레이크 프로세서의 후속 모델이 될 Intel Elkhart Lake 프로세서에 대해읽었습니다.새로운 프로세서는 10nm 프로세스를 사용하여 제조해야하지만 일부 Elkhart Lake 프로세서가빠른 Sunny Cove 코어와 여러 Atom 클래스 Tremont 코어를 결합한Intel Foveros의 일부인지 여부는 아직 명확하지 않습니다.
지금까지 기술 측면에서 우리가 알고있는 전부입니다.대만의 전자 회사 인 MITAC의제품 로드맵(PDF)은 새로운 Elkhart Lake Celeron / Pentium 프로세서를 기대할 수있는시기를 알려줍니다.
먼저 우리는 2020 년 1 분기에 대량 생산을 계획 한 PD10EKI 박형 mini-ITX 임베디드 마더 보드를 보유하고 있으며이 회사는 얇은 mini-ITX 제품군을 위해 제미니 호수를 건너 뛰었던 회사의 Apollo Lake 모델을 업데이트 할 예정입니다.
두 번째 마더 보드는 2020 년 1 분기에 계획된 PD11EKI mini-ITX 임베디드 마더 보드입니다. 마지막으로 MITAC은 2019 년 12 월에 엔지니어링 샘플 (EVT = Engineering Verification Testing)을 사용하여 Intel Elkhart Lake 기반의 견고한 태블릿을 출시 할 계획입니다.
Apollo Lake 태블릿 로드맵은 엔지니어링 샘플 공급과 대량 생산 사이에서 약 8 개월 정도 걸리므로, Elkhart Lake 태블릿은 2020 년 8 월경 대량 생산 될 수 있습니다.
아직 일 년 중 아직 인텔이나 다른 실리콘 공급 업체가 제조 나 다른 문제로 인해 지연되는 것은 처음이 아니기 때문에 어떻게보아야 할 지 알 수 있습니다.
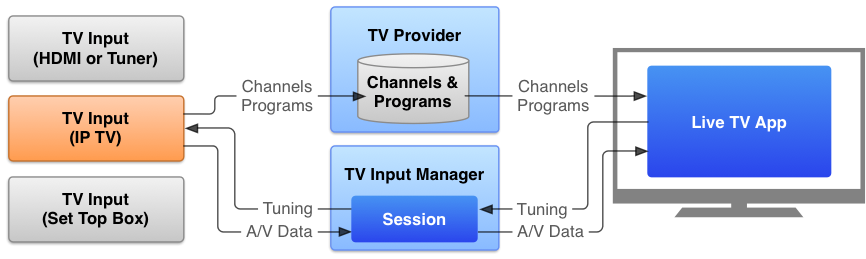
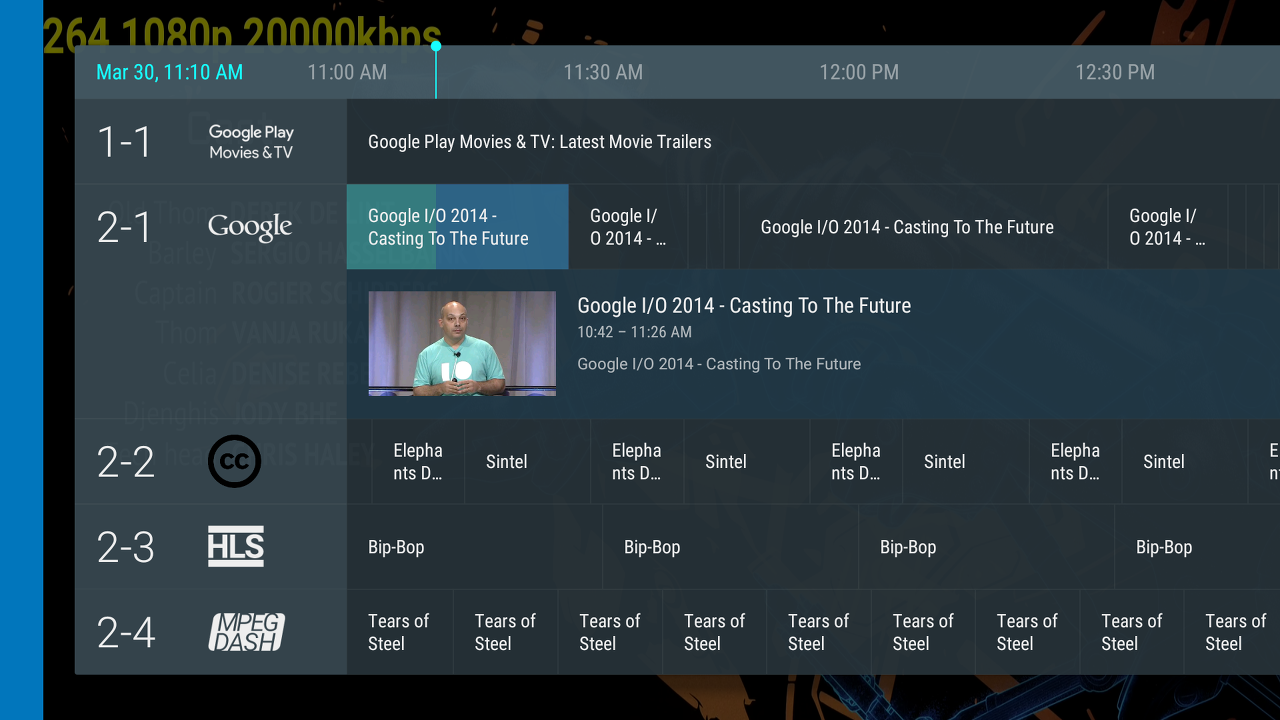
생방송 TV 프로그램 및 기타 연속 채널 기반 콘텐츠를 보는 것은 TV 경험의 중요한 부분입니다.사용자는 채널 탐색을 통해 TV에서 프로그램을 선택하고 시청하는 데 익숙합니다.TV 입력 프레임 워크는 TV 프로그래밍 가이드에서 비디오 또는 음악 컨텐트를 게시하기위한 채널을 만듭니다.
참고 :TV 입력 프레임 워크는 Android 시스템 TV 앱의 채널을 만드는 데 OEM에서 사용하기위한 것입니다.Android 5.0 (API 레벨 21)에서 Android 7.1 (API 레벨 25)을 통해서만 지원됩니다.타사 앱은 Android TV 홈 화면 API를 사용하여 콘텐츠 채널을 구축해야합니다.자세한내용은TV 콘텐츠 추천을 참조하십시오.
TV 입력 프레임 워크는 HDMI 포트 및 내장 튜너와 같은 하드웨어 소스 및 인터넷을 통해 스트리밍 된 비디오와 같은 소프트웨어 소스에서 라이브 비디오 컨텐츠를 수신하고 재생하는 통일 된 방법을 제공합니다.
이 프레임 워크를 통해 개발자는 TV 입력 서비스를 구현하여 라이브 TV 입력 소스를 정의 할 수 있습니다.이 서비스는 TV 공급자에게 채널 및 프로그램 목록을 게시합니다.TV 장치의 라이브 TV 앱은 TV 공급자로부터 사용 가능한 채널 및 프로그램 목록을 가져 와서 사용자에게 표시합니다.사용자가 특정 채널을 선택하면, 라이브 TV 앱은 TV 입력 관리자를 통해 연관된 TV 입력 서비스에 대한 세션을 생성하고, TV 입력 서비스에 요청 된 채널을 튜닝하고, 사용자가 제공 한 디스플레이 표면으로 콘텐츠를 재생하도록 지시한다 TV 앱.
그림 1.TV 입력 프레임 워크의 기능적 다이어그램
TV 입력 프레임 워크는 다양한 라이브 TV 입력 소스에 대한 액세스를 제공하고 사용자가 콘텐츠를 검색,보고 및 감상 할 수 있도록 단일 사용자 인터페이스에서 함께 가져올 수 있도록 설계되었습니다.콘텐츠 용 TV 입력 서비스를 구축하면 TV 장치에서 더 쉽게 액세스 할 수 있습니다.
TV 입력 서비스 개발시스템 TV 앱과 함께 작동하는 TV 입력 서비스를 개발하는 방법에 대해 알아보십시오.채널 데이터로 작업시스템의 채널 및 프로그램 데이터를 설명하는 방법을 익히십시오.사용자 상호 작용 관리오버레이를 표시하고, 콘텐츠 가용성을 관리하고, 콘텐츠 선택을 처리하는 방법에 대해 알아보십시오.시간 이동 지원TV 입력 서비스에서 시간 이동을 지원하는 방법에 대해 알아보십시오.콘텐츠 레코딩 지원TV 입력 서비스에서 콘텐츠 레코딩을 지원하는 방법에 대해 알아보십시오.
A TV input service represents a media stream source, and lets you present your media content in a linear, broadcast TV fashion as channels and programs. With a TV input service, you can provide parental controls, program guide information, and content ratings. The TV input service works with the Android system TV app. This app ultimately controls and presents channel content on the TV. The system TV app is developed specifically for the device and immutable by third-party apps. For more information about the TV Input Framework (TIF) architecture and its components, seeTV Input Framework.
Create a TV input service using the TIF Companion Library
The TIF Companion Library is a framework that provides extensible implementations of common TV input service features. Use the TIF Companion Library to quickly and easily create your own TV input service that follows best practices for Android TV.
Update your project
To get started using the TIF Companion Library, add the following to your app’sbuild.gradlefile:
The TIF Companion Library is not currently part of the Android framework. It is distributed as a Gradle dependency through jcenter, not with the Android SDK. Check jcenter to find the latest version of thetif-companion library.
Declare your TV input service in the manifest
Your app must provide aTvInputService-compatible service that the system uses to access your app. The TIF Companion Library provides theBaseTvInputServiceclass, which provides a default implementation ofTvInputServicethat you can customize. Create a subclass ofBaseTvInputService, and declare the subclass in your manifest as a service.
Within the manifest declaration, specify theBIND_TV_INPUTpermission to allow the service to connect the TV input to the system. A system service performs the binding and has theBIND_TV_INPUTpermission. The system TV app sends requests to TV input services via theTvInputManagerinterface.
In your service declaration, include an intent filter that specifiesTvInputServiceas the action to perform with the intent. Also declare the service metadata as a separate XML resource. The service declaration, intent filter, and service metadata declaration are shown in the following example:
<serviceandroid:name=".rich.RichTvInputService" android:label="@string/rich_input_label" android:permission="android.permission.BIND_TV_INPUT"> <!-- Required filter used by the system to launch our account service. --> <intent-filter> <actionandroid:name="android.media.tv.TvInputService"/> </intent-filter> <!-- An XML file which describes this input. This provides pointers to the RichTvInputSetupActivity to the system/TV app. --> <meta-data android:name="android.media.tv.input" android:resource="@xml/richtvinputservice"/> </service>
Define the service metadata in a separate XML file. The service metadata XML file must include a setup interface that describes the TV input's initial configuration and channel scan. The metadata file should also contain a flag stating whether or not users are able to record content. For more information on how to support recording content in your app, seeTV recording.
The service metadata file is located in the XML resources directory for your app and must match the name of the resource you declared in the manifest. Using the manifest entries from the previous example, you would create the XML file atres/xml/richtvinputservice.xml, with the following contents:
Your TV input service must define at least one channel that users access via the system TV app. You should register your channels in the system database, and provide a setup activity that the system invokes when it cannot find a channel for your app.
First, enable your app to read from and write to the system Electronic Programming Guide (EPG), whose data includes channels and programs available to the user. To enable your app to perform these actions, and sync with the EPG after device restart, add the following elements to your app manifest:
Next, create a class which extends theEpgSyncJobServiceclass. This abstract class makes it easy to create a job service that creates and updates channels in the system database.
In your subclass, create and return your full list of channels ingetChannels(). If your channels come from an XMLTV file, use theXmlTvParserclass. Otherwise generate channels programmatically using theChannel.Builderclass.
For each channel, the system callsgetProgramsForChannel()when it needs a list of programs that can be viewed within a given time window on the channel. Return a list ofProgramobjects for the channel. Use theXmlTvParserclass to obtain programs from an XMLTV file, or generate them programmatically using theProgram.Builderclass.
For eachProgramobject, use anInternalProviderDataobject to set program information such as the program's video type. If you only have a limited number of programs that you want the channel to repeat in a loop, use theInternalProviderData.setRepeatable()method with a value oftruewhen setting information about your program.
After you've implemented the job service, add it to your app manifest:
Finally, create a setup activity. Your setup activity should provide a way to sync channel and program data. One way to do this is for the user to do it via the UI in the activity. You might also have the app do it automatically when the activity starts. When the setup activity needs to sync channel and program info, the app should start the job service:
val inputId = getActivity().intent.getStringExtra(TvInputInfo.EXTRA_INPUT_ID) EpgSyncJobService.cancelAllSyncRequests(getActivity()) EpgSyncJobService.requestImmediateSync( getActivity(), inputId, ComponentName(getActivity(),SampleJobService::class.java) )
Use therequestImmediateSync()method to sync the job service. The user must wait for the sync to finish, so you should keep your request period relatively short.
Use thesetUpPeriodicSync()method to have the job service periodically sync channel and program data in the background:
The TIF Companion Library provides an additional overloaded method ofrequestImmediateSync()that lets you specify the duration of channel data to sync in milliseconds. The default method syncs one hour's worth of channel data.
The TIF Companion Library also provides an additional overloaded method ofsetUpPeriodicSync()that lets you specify the duration of channel data to sync, and how often the periodic sync should occur. The default method syncs 48 hours of channel data every 12 hours.
When a user selects a specific channel, the system TV app uses aSession, created by your app, to tune to the requested channel and play content. The TIF Companion Library provides several classes you can extend to handle channel and session calls from the system.
YourBaseTvInputServicesubclass creates sessions which handle tuning requests. Override theonCreateSession()method, create a session extended from theBaseTvInputService.Sessionclass, and callsuper.sessionCreated()with your new session. In the following example,onCreateSession()returns aRichTvInputSessionImplobject that extendsBaseTvInputService.Session:
When the user uses the system TV app to start viewing one of your channels, the system calls your session'sonPlayChannel()method. Override this method if you need to do any special channel initialization before the program starts playing.
The system then obtains the currently scheduled program and calls your session'sonPlayProgram()method, specifying the program information and start time in milliseconds. Use theTvPlayerinterface to start playing the program.
Your media player code should implementTvPlayerto handle specific playback events. TheTvPlayerclass handles features like time-shifting controls without adding complexity to yourBaseTvInputServiceimplementation.
In your session'sgetTvPlayer()method, return your media player that implementsTvPlayer. TheTV Input Servicesample app implements a media player that usesExoPlayer.
Create a TV input service using the TV input framework
If your TV input service can't use the TIF Companion Library, you need to implement the following components:
TvInputServiceprovides long-running and background availability for the TV input
TvInputService.Sessionmaintains the TV input state and communicates with the hosting app
TvContractdescribes the channels and programs available to the TV input
Create and register your channel and program information.
Create your setup activity.
Define your TV input service
Figure 1.TvInputService lifecycle.
For your service, you extend theTvInputServiceclass. ATvInputServiceimplementation is abound servicewhere the system service is the client that binds to it. The service life cycle methods you need to implement are illustrated in figure 1.
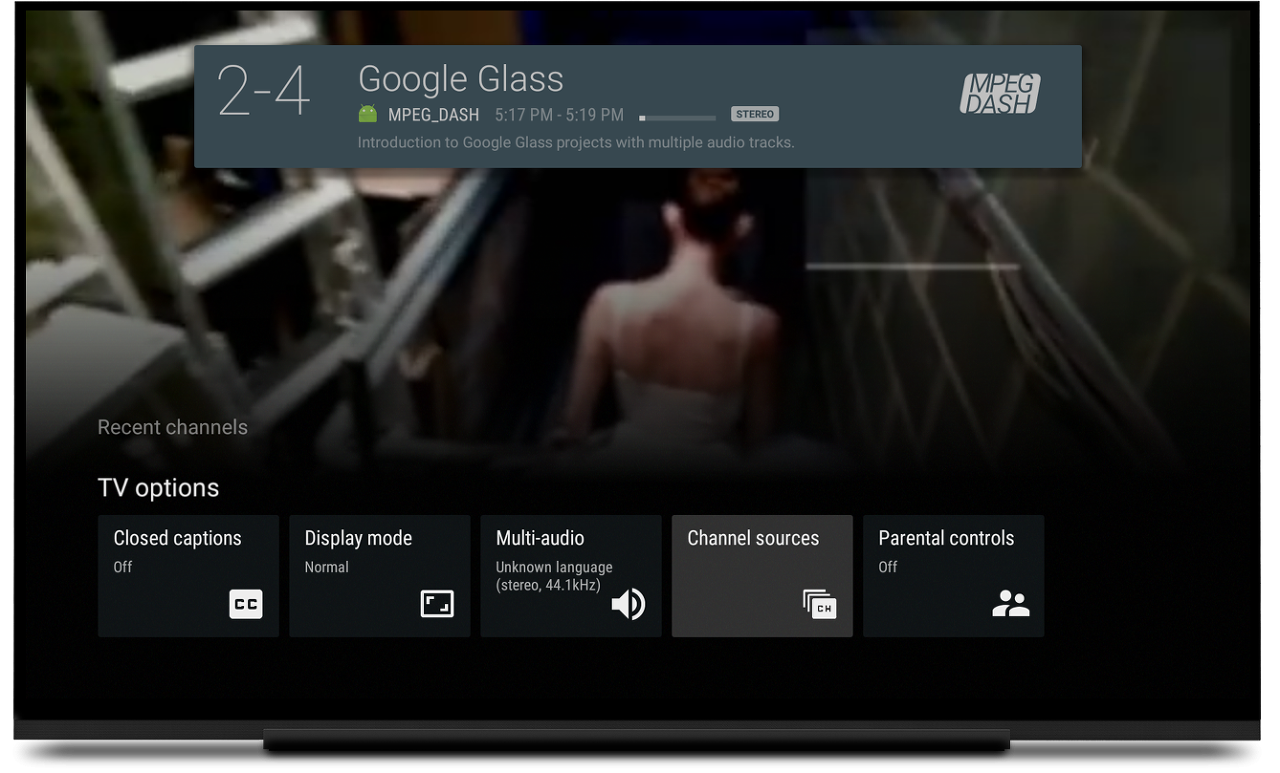
TheonCreate()method initializes and starts theHandlerThreadwhich provides a process thread separate from the UI thread to handle system-driven actions. In the following example, theonCreate()method initializes theCaptioningManagerand prepares to handle theACTION_BLOCKED_RATINGS_CHANGEDandACTION_PARENTAL_CONTROLS_ENABLED_CHANGEDactions. These actions describe system intents fired when the user changes the parental control settings, and when there is a change on the list of blocked ratings.
SeeControl contentfor more information about working with blocked content and providing parental control. SeeTvInputManagerfor more system-driven actions that you may want to handle in your TV input service.
The system TV app works with the setup activity you define for your TV input. The setup activity is required and must provide at least one channel record for the system database. The system TV app invokes the setup activity when it cannot find a channel for the TV input.
The setup activity describes to the system TV app the channels made available through the TV input, as demonstrated in the next lesson,Create and update channel data.